policies

Subscribe to all “policies” posts via RSS or follow GitHub Changelog on Twitter to stay updated on everything we ship.

~ cd github-changelog
~/github-changelog|main git log main
showing all changes successfully

Starting on 1 October 2024, we will begin collecting Japanese Consumption Tax (JCT) from self-serve customers in Japan who pay with a credit card or a PayPal account to comply with Japan Tax Regulations. If you are a self-serve paying customer in Japan, there will be updates to your invoice that show GitHub Inc.’s Registration Number (T4700150079306), and the 10% consumption tax amount in USD and JPY.

See more

Starting August 19th, 2024, we will begin collecting state-mandated sales tax, where and when applicable, from paying customers in the United States to align GitHub with industry standard regulatory practices. All United States customers are required to update payment information (specifically your address) to ensure the correct sales tax amount is assessed. If you are a paying customer, there will be a tax line on your receipt that provides a breakdown of the applicable taxes for the GitHub products and services you have purchased.

As of today, you will have the ability to make updates on the Payment Information page. Please update your address and provide the following information if applicable:

  • We have updated the address collection fields to require:
    • Street Address
    • City
    • Zip Code +4 (5-digit ZIP required, +4 as optional)
  • If you qualify for an exemption or as a tax-exempt entity, you MUST submit an applicable and fully completed sales tax exemption certificate for review and approval on the Payment Information page.

You will have until August 19, 2024 to make these changes. Failure to do so may result in a disruption of service.

To learn more about how to make updates to your payment information, please click here to view a step by step guide. For more information on how to submit a sales tax exemption certificate, please click here.

See more

Say goodbye to unwanted files cluttering your repos, like *.jar or *.so. And limit who can make updates to sensitive files like your Actions workflows with the public beta of push rules. 🎉

A glimpse of push rules in action

You can now enable a new type of ruleset that allows you to control pushes to repositories based on file extensions, file path lengths, file and folder paths and file sizes. Push rules don’t require any branch targeting as they apply to every push to the repository, and also apply to all forks of the repo to ensure all pushes to the repository network are protected.

Push rules are now available for private and internal repositories for GitHub Teams, and across organizations for GitHub Enterprise Cloud.

Learn more about push rules in our documentation and join the community discussion to leave feedback.

See more

Auto-triage rules are a powerful tool to help you reduce false positives and alert fatigue substantially, while better managing your alerts at scale. We've heard your feedback, which is helping us improve throughout this beta period.

Starting today, you can now create Dependabot auto-triage rules using CVE IDs or GHSA IDs to target subsets of alerts.

How do I learn more?

How do I provide feedback?

Let us know what you think by providing feedback — we’re listening!

See more

Auto-triage rules are a powerful tool to help you reduce alert and pull request fatigue substantially, while better managing your alerts at scale.

What's changing?

Starting today, you can define your own rules to control and enforce Dependabot behaviors across organizations and individual repositories.

  • You can now define which alerts receive pull requests to resolve them, rather than targeting all alerts.
  • You can enable and enforce those Dependabot security update rules across organizations, in addition to individual repositories.
  • You can enable, disable, or enforce how GitHub default rulesets are applied across your organization.
  • You can also now enable and enforce custom auto-dismiss (alert ignore and snooze) rules across organizations.
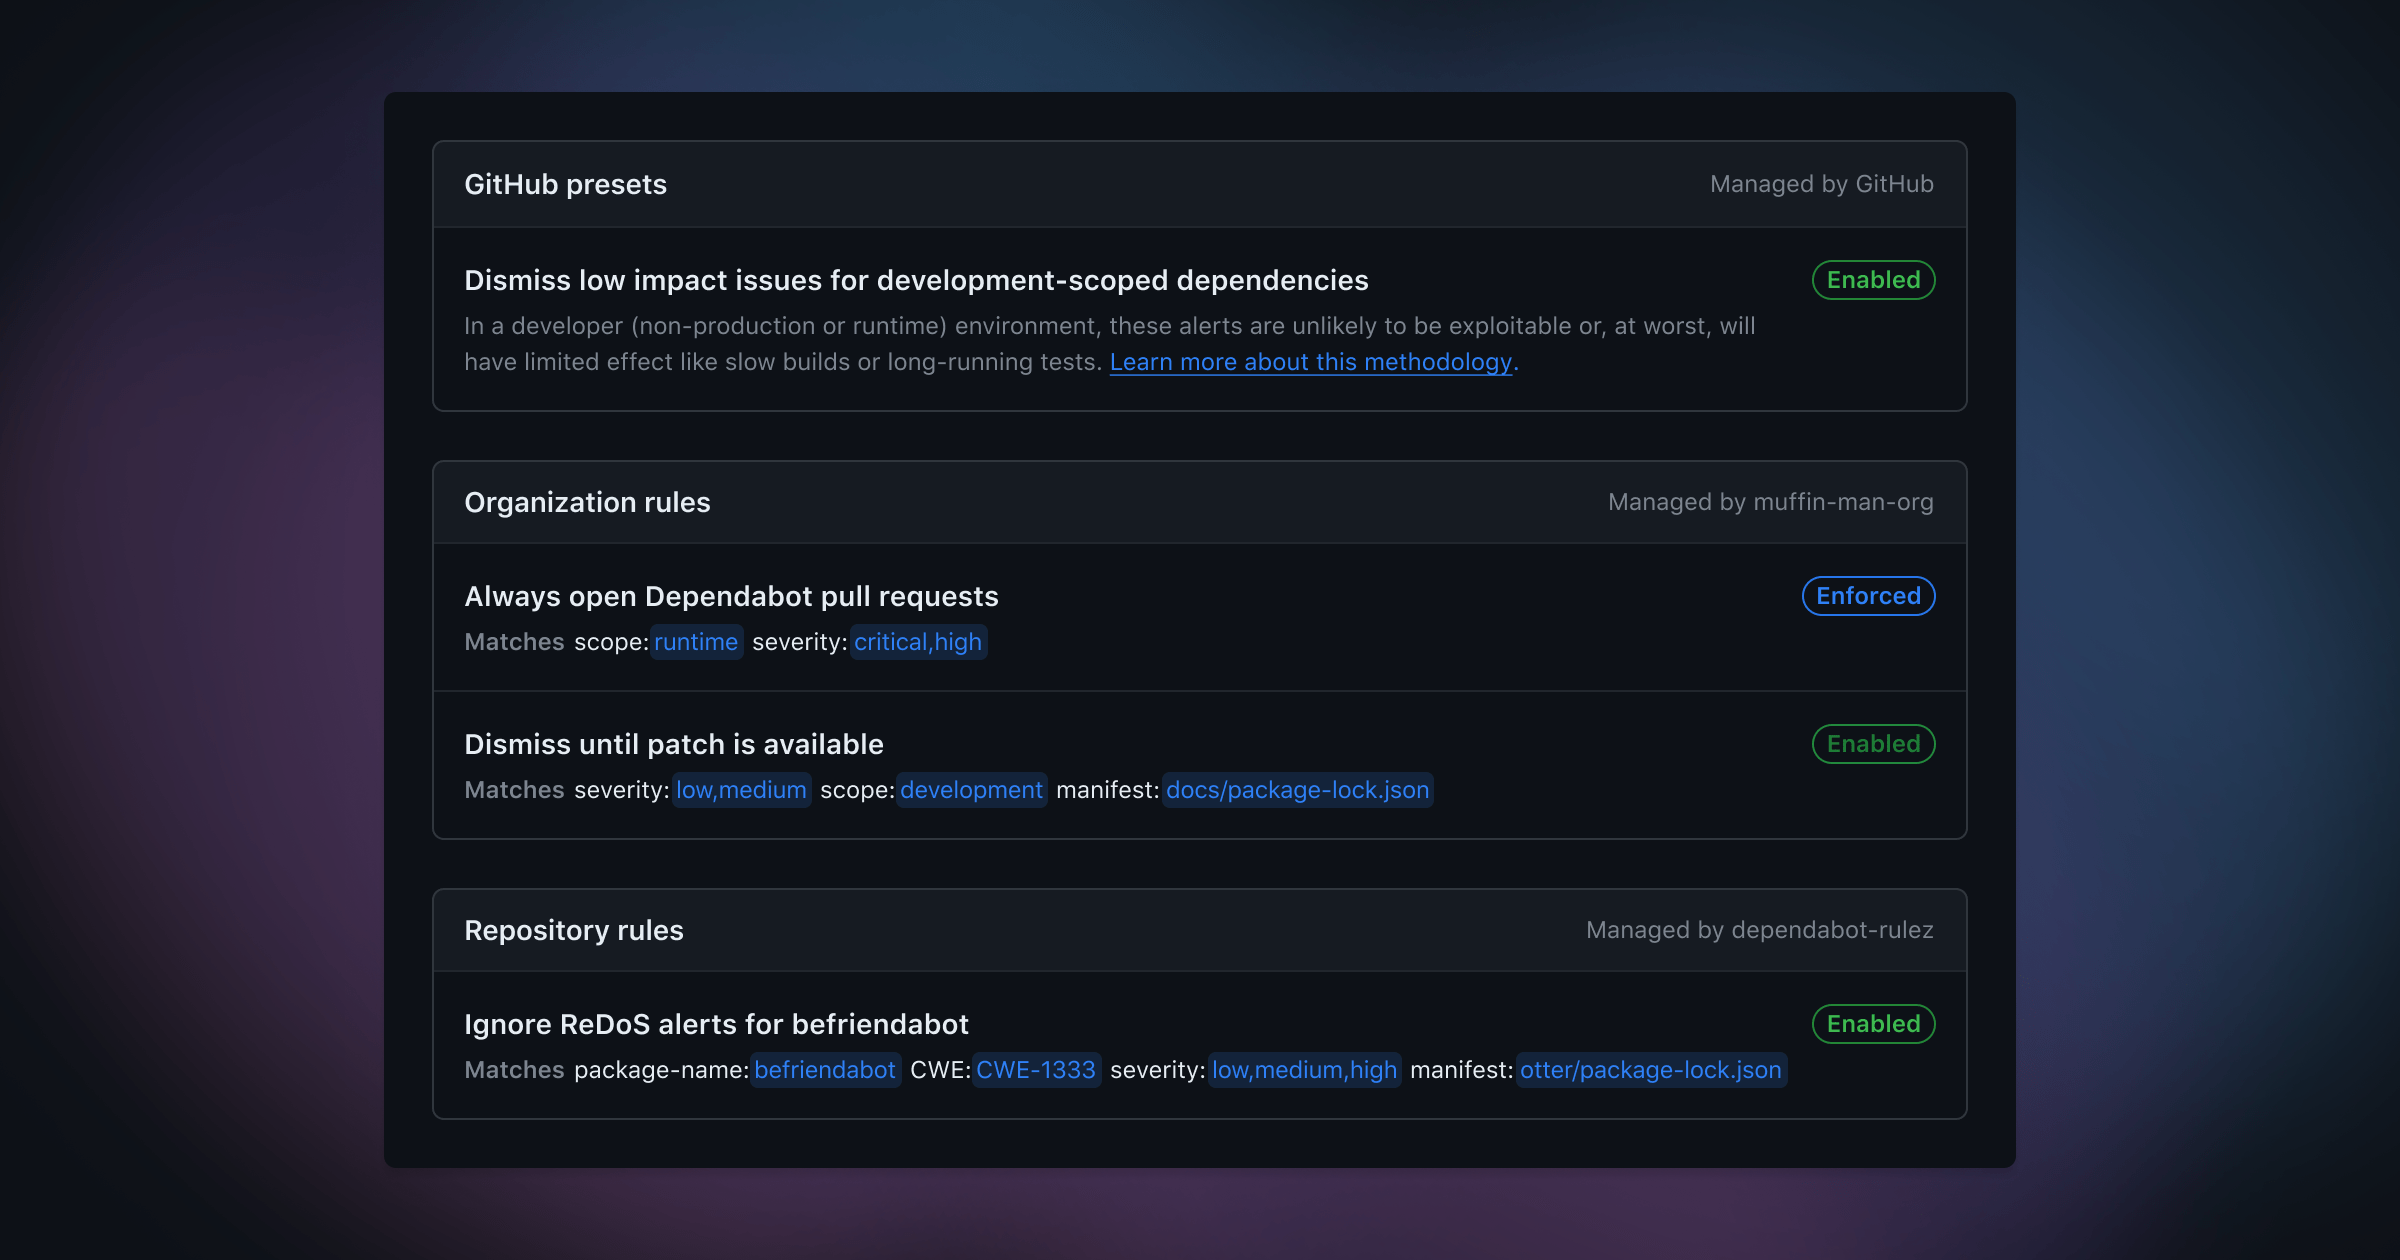
Dependabot auto-triage rules list

Auto-triage rules are defined by alert targeting criteria, the behaviors you'd like Dependabot to automatically perform for these alerts, as well as how you want the rule to be enabled or enforced across your organization.

Alerts can be targeted based on metadata related to the advisory, dependency, and how it's used. For this public beta, currently supported attributes at the organization level are: severity, scope, package-name, cwe, and ecosystem. At the repository level, you can also target specific manifest files.

Create a stacked Dependabot auto-triage ruleset

For any existing or future alerts that match a custom rule, Dependabot will perform the selected behavior accordingly. You can proactively filter out false positives, snooze alerts until patch release, choose which alerts open Dependabot security updates, and – as rules apply to both future and current alerts – manage existing alerts in bulk.

This feature is free for open source (all public repositories) and available for use in private repositories through GitHub Advanced Security.

Frequently asked questions

Why is GitHub making this change?

At GitHub, we’ve been thinking deeply about how to responsibly address long-running issues around alert fatigue and false positives. Rather than over-indexing on one criterion like reachability or dependency scope, we believe that a responsibly-designed solution should be able to detect and reason on a rich set of complex, contextual alert metadata.

That’s why, moving forward, we’re releasing a series of ships powered by a flexible and powerful alert rules engine. Our first ship – Dependabot presets – leveraged our rules engine with GitHub-curated vulnerability patterns and has helped millions of repositories filter out false positive alerts. Today’s ship exposes our rules engine at the organization and repository levels, so you can create and enforce custom rules, too.

How do I create a rule?

From your organization or repository settings page, admins and security managers can navigate to Code security and analysis settings. Under Dependabot, select Dependabot rules to add or modify your own custom rules or modify GitHub presets.

How do I enforce rules for my organization?

Enforce a Dependabot auto-triage rule

At the organization level, rules can be set with the following states.

State Description
Enabled This rule will be enabled across all eligible repositories in your organization. It will be on by default (new repositories are included). Any individual repository can choose to disable the rule.
Enforced This rule will be enabled across all eligible repositories in your organization. It will be on by default (new repositories are included). Individual repositories cannot override this setting.
Disabled This rule will be disabled and hidden across your organization.

At the repository level, rules can be set to enabled or disabled if they're not enforced.

Which criteria are supported?

Rules can be created across the following attributes:

Attribute Description
severity Alert severity, based on CVSS base score, across the following values: low, medium, high, and critical.
scope Scope of the dependency: development (devDependency) or runtime (production).
package-name Packages, listed by package name.
cwe CWEs, listed by CWE ID.
ecosystem Ecosystems, listed by ecosystem name.
manifest Manifest files, listed by manifest path.

Note: manifest is only available at the repository level.

Target alerts based on attributes

How do I control how Dependabot automatically generates pull requests for alerts?

You can use the alert criteria (above) to indicate which alerts Dependabot will attempt to open pull requests to resolve. To use auto-triage rules with Dependabot updates, you must disable Dependabot's option to always open pull requests to resolve all open alerts from the repository Code security and analysis settings.

How do I control how Dependabot automatically closes or reopens alerts?

Similar to Dependabot pull request rules, you can control how Dependabot filters out false postives (with dismiss indefinitely) or snoozes alerts (with dismiss until patch).

How many custom rules can I create?

At the time of public beta, you can create 20 rules per organization and 10 rules for each repository. Want more? Let us know!

How will this activity be reported?

Auto-dismissal activity is shown in webhooks, REST, GraphQL, and the audit log for Dependabot alerts. Alerts are dismissed without a notification or new pull request and appear as a special timeline event. As these alerts are closed, you’ll still be able to review any auto-dismissed alerts with the resolution:auto-dismissed filter.

Who can create and modify rules?

Auto-triage rules are free for open source repositories. Anyone who can enable Dependabot alerts for a public repository will be able to create custom rules for it. Customers of GitHub Advanced Security can create and manage custom rules across private repositories and at the organization level.

How do I reopen an automatically dismissed alert?

Like any manually dismissed alert, you can reopen an auto-dismissed alert from the alert list view or details page. This specific alert won’t be auto-dismissed again (by any other auto-dismiss rule).

What happens if alert metadata changes or advisory information is withdrawn?

Dependabot recognizes and immediately responds to any changes to metadata which void auto-dismissal logic. For example, if you change the dependency scope and the alert no longer meets the criteria to be auto-dismissed, the alert will automatically reopen.

How do I learn more?

How do I provide feedback?

Let us know what you think by providing feedback — we’re listening!

See more

Auto-triage rules are a powerful tool to help you reduce false positives and alert fatigue substantially, while better managing your alerts at scale.

Starting today, you can now create your own custom rules to control how Dependabot auto-dismisses and reopens alerts – so you can focus on the alerts that matter, without worrying about the alerts that don’t.

What’s changing?

For any existing or future alerts that match a custom rule, Dependabot will perform the selected behavior accordingly. You can proactively filter out false positives, snooze alerts until patch release, and – as rules apply to both future and current alerts – manage existing alerts in bulk.

Frequently asked questions

Why is GitHub making this change?

At GitHub, we’ve been thinking deeply about how to responsibly address long-running issues around alert fatigue and false positives. Rather than over-indexing on one criterion like reachability or dependency scope, we believe that a responsibly-designed solution should be able to detect and reason on a rich set of complex, contextual alert metadata.

That’s why, moving forward, we’re releasing a series of ships powered by an underlying, all-new, flexible and powerful alert rules engine. Our first ship – Dependabot presets – leveraged our rules engine with GitHub-curated vulnerability patterns. Today’s ship exposes our rules engine so you can create your own rules, too.

Which criteria are supported?

Rules can be created across the following attributes:

Attribute Description
severity Alert severity, based on CVSS base score, across the following values: low, medium, high, and critical.
scope Scope of the dependency: development (devDependency) or runtime (production).
package-name Packages, listed by package name.
cwe CWEs, listed by CWE ID.
ecosystem Ecosystems, listed by ecosystem name.
manifest Manifest files, listed by manifest path.

What behaviors are supported?

Create or edit a custom rule

Today’s ship covers support for auto-dismissing alerts indefinitely as well as snoozing alerts until patch. Auto-dismissing ensures all activity is easily visible and can be caught by existing reporting systems and workflows, while also ensuring that alerts can be reintroduced if metadata across the alert changes.

How will this activity be reported?

Auto-dismissal activity is shown in webhooks, REST, GraphQL, and the audit log for Dependabot alerts. Alerts are dismissed without a notification or new pull request and appear as a special timeline event. As these alerts are closed, you’ll still be able to review any auto-dismissed alerts with the resolution:auto-dismissed filter.

Who can create and modify rules?

Auto-triage rules are free for open source repositories. Anyone who can enable Dependabot alerts for a public repository will be able to create custom rules for it. Customers of GitHub Advanced Security can create and manage custom rules across private repositories.

How do I reopen an automatically dismissed alert?

Like any manually dismissed alert, you can reopen an auto-dismissed alert from the alert list view or details page. This specific alert won’t be auto-dismissed again (by any other auto-dismiss rule).

What happens if alert metadata changes or advisory information is withdrawn?

Dependabot recognizes and immediately responds to any changes to metadata which void auto-dismissal logic. For example, if you change the dependency scope and the alert no longer meets the criteria to be auto-dismissed, the alert will automatically reopen.

How do I learn more?

How do I provide feedback?

Let us know what you think by providing feedback — we’re listening!

See more

When editing a file on github.com, repo admins, actors with the bypass branch protections permissions, and actors in bypass lists on branch protections will now default to creating a new branch instead for directly committing. You can still commit directly to a protected branch, but doing so will add notifications in-line highlighting that some rules will be bypassed.

Historically the default behavior was to push through any branch protections with no notifications they were being bypassed.

Now we recommend creating a branch for admins eligible to bypass branch protection rules. This behavior occurs when adding new files to a repository as well as during pull requests.

Screenshot of commiting directly to a repository
Screenshot of bypassing rules in a PR>

We appreciate your feedback in GitHub's public feedback discussions

See more

Today we are announcing the public beta of repository rules! 🎉

Repository rules are GitHub’s next evolution of branch protections to help make your repositories more secure and compliant at scale.

Screenshot of ruleset overview

Rules allow you to easily define protections for branches and tags in your repositories and, if you are a GitHub Enterprise Cloud customer, to enforce them across your organization. It is also easier for everyone collaborating on your repositories to know what rules are in place.

Creating rules

Screenshot of creating a ruleset

At the core of rules is the ability to define rulesets. A ruleset is a collection of rules that are enforced together. For example, you could require that all commits to a branch are signed and that those commits have two reviewers. Rulesets can also be applied to tags, allowing you to enforce rules on releases.

The ruleset page is the central place to view and manage all the rules for a repository. It shows the rules that are currently in place and allows you to add new rulesets or edit existing ones.

When creating a ruleset, you define its enforcement status as active or disabled. Active rulesets must pass for a commit to be merged, while disabled rulesets are not enforced; they will not prevent merges but allow admins to craft rules before enforcing them. Enterprise Cloud customers can also evaluate rulesets: a “dry run” mode for understanding the impact of new rules before they are active and enforced.

It’s also easier to target branches and tags in rulesets, with options to select the default branch, all branches, and branches or tags that match an fnmatch pattern. You can add multiple patterns to a ruleset to apply it to different branch and tag naming styles.

Viewing the rules

You can always know what rules are in place for a repository.

Anyone with read access to a repository can view its rules and what they mean. The rulesets overview is linked from the branches page by clicking the shield icon, and from a pull request, and from the output of the Git CLI when rules block a push.

From here, you can filter rules by branches or tags to understand how a rule might be enforced on your next push.

Screenshot of read only view of rules

Getting Started

Repository rules are now available to all GitHub cloud customers. To get started, visit the documentation to learn how to enable and use rules. For Enterprise Cloud customers, visit the documentation to learn about organization rulesets and more.

We want to hear from you on how we can improve repository rules! Join the conversation in the repository rules public beta discussion.

See more

We now show bypassed branch protection rules in response to Git pushes. These are information messages and are not designed to block workflows.

Historically there was no indication after a Git push that branch rules had been bypassed.

Repo admins, actors with the bypass branch protections permissions, and actors in bypass lists on branch protections will now see a list of rules that were bypassed.

Screenshot of Git command line interface showing list of rules

We appreciate your feedback in GitHub's public feedback discussions

See more

In June 2022 we updated fork capabilities to include forking a repository into the same organization as its upstream repository, forking internal repositories to enterprise organizations, and for enterprise owners to limit where forks can be created. This opened up a lot of new possibilities for collaboration!

We recently updated fork capabilities again to unblock an additional workflow: fork repositories into another organization more than once. Before, when you tried to fork a repository into another organization that already had a fork of that repository, your option to finish forking into that organization was grayed out and GitHub let you know that a fork already exists in the target organization. With this update, you will have the option to continue forking it using a unique name.

screenshot of forking when the repo already exists and has a red warning triangle

screenshot of forking when the fork has been renamed and has a green check

We welcome your feedback on this in GitHub’s public feedback discussions.

See more

Organizations and enterprises using branch protections may see false-alert flags in their security log for protected_branch.policy_override and protected_branch.rejected_ref_update events between January 6 and January 11, 2023.
These events were improperly emitted due to a change in the underlying logic that checks if branch protection criteria have been met.

No action is required from impacted users with regards to these events. GitHub has a policy to not delete security log events, even ones generated in error. For this reason, we are adding flags to signal that these events are false-alerts.

an audit log entry with the flash message displayed above it

See more

Today we're releasing two new branch protections.

Require approval from someone other than the last pusher

Now, before a pull request can be merged, you can require it to be approved by someone other than the last pusher.
Meaning, the most recent user to push their changes will need a pull request approval regardless of the Require approvals branch protection. Or in the case of 1 approval required, someone other than the last user to push their changes will also need to approve. If the approvals come from other folks than the last pusher, those two approvals will be sufficient.

Screenshot of Last Push protection enabled.

Lock branch

This allows for branches to be locked, prohibiting changes. You can lock a branch allowing you to have a maintenance window and prevent changes, or to protect a fork so it only receives changes from its upstream repository.

To use this feature in a branch protection rule, enable Lock branch.

Screenshot of Lock branch with fork sync enabled

For more information, read About protected branches in the GitHub documentation.

We appreciate feedback on this and other topics in GitHub's public feedback discussions.

See more

Previously, we announced the ability for enterprise owners to limit where private and internal repository forks can be created. We heard from some customers that they need a more granular control over fork permissions for each organization within the enterprise.

Now, we've added the ability for enterprise organization admins to set fork policy at the organization level, further restricting enterprise policy. Forking can be limited to organizations within the enterprise, within the same organization, user accounts and organization within the enterprise, user accounts, or everywhere. Fork policies cascade from the enterprise policy to organization policy to repository policy. Enterprise policies dictate the policy options available for organizations, i.e. an organization admin can only set a more restrictive forking policy than the enterprise allows.

Screenshot of organization fork policy settings

See more

Previously, three aspects of repository forks caused friction to innersource collaboration and administration:

  1. Repositories could not be forked within a single organization.
  2. Repositories with internal visibility could not be forked to an organization.
  3. Enterprise owners lacked control over where repositories could be forked.

These obstacles have been addressed with the following new features. We’re always looking for new ways to improve repository collaboration and we welcome your ideas.

Fork a repository to the same organization as its parent

Previously, a repository could be forked only to a different organization or user account.

Now, a repository can be forked to the same organization as its parent repository, addressing situations where people are working in one organization and don’t want to fork a repository to a different organization or user account.

Fork internal repositories to enterprise organizations

Previously, when a repository with internal visibility was forked, the fork was automatically created in the person’s personal account space and its visibility was changed to private.

Now, people can fork an internal repository to an organization in the same enterprise, and the fork will retain its internal visibility. When forking an internal repository, you can choose which of the enterprise’s organizations should receive the fork – similar to forking a public repository, except that:

  1. The destination organizations will be limited to those within the enterprise of the parent repository.
  2. You will not be permitted to change the internal visibility of the fork while forking it.

Enterprise owners can limit where forks can be created

Previously, enterprise owners couldn’t restrict where repositories in the enterprise could be forked. This was important for them to keep confidential repositories from accidentally being forked to an exposed location.

Now, enterprise owners can control where enterprise members can fork repositories. Forking can be limited to preset combinations of enterprise organizations, the same organization as the parent repository, user accounts, and everywhere.

Image of enterprise settings for controlling where repositories can be forked

More information

Learn more about working with forks, or enforcing a policy for forking repositories, in the GitHub documentation.

We appreciate feedback on this and other topics in GitHub’s public feedback discussions.

See more