The trace2receiver component is open source and covered by the MIT License, so grab the code and try it out.
See the contribution guide for details on how to contribute.
Use our new open source Trace2 receiver component and OpenTelemetry to capture and visualize telemetry from your Git commands.

When I think about large codebases, the repositories for Microsoft Windows and Office are top of mind. When Microsoft began migrating these codebases to Git in 2017, they contained 3.5M files and a full clone was more than 300GB. The scale of that repository was so much bigger than anything that had been tried with Git to date. As a principal software engineer on the Git client team, I knew how painful and frustrating it could be to work in these gigantic repositories, so our team set out to make it easier. Our first task: understanding and improving the performance of Git at scale.
Collecting performance data was an essential part of that effort. Having this kind of performance data helped guide our engineering efforts and let us track our progress, as we improved Git performance and made it easier to work in these very large repositories. That’s why I added the Trace2 feature to core Git in 2019—so that others could do similar analysis of Git performance on their repositories.
| Trace2 is an open source performance logging/tracing framework built into Git that emits messages at key points in each command, such as process exit and expensive loops. You can learn more about it here. |
Whether they’re Windows-sized or not, organizations can benefit from understanding the work their engineers do and the types of tools that help them succeed. Today, we see enterprise customers creating ever-larger monorepos and placing heavy demands on Git to perform at scale. At the same time, users expect Git to remain interactive and responsive no matter the size or shape of the repository. So it’s more important than ever to have performance monitoring tools to help us understand how Git is performing for them.
Unfortunately, it’s not sufficient to just run Git in a debugger/profiler on test data or a simulated load. Meaningful results come from seeing how Git performs on real monorepos under daily use by real users, both in isolation and in aggregate. Making sense of the data and finding insights also requires tools to visualize the results.
Trace2 writes very detailed performance data, but it may be a little difficult to consume without some help. So today, we’re introducing an open source tool to post-process the data and move it into the OpenTelemetry ecosystem. With OpenTelemetry visualization tools, you’ll be able to easily study your Git performance data.
This tool can be configured by users to identify where data shapes cause performance deterioration, to notice problematic trends early on, and to realize where Git’s own performance needs to be improved. Whether you’re simply interested in your own statistics or are part of an engineering systems/developer experience team, we believe in democratizing the power of this kind of analysis. Here’s how to use it.
The emerging standard for analyzing software’s performance at scale is OpenTelemetry.
| An article from the Cloud Native Computing Foundation (CNCF) gives an overview of the OpenTelemetry technologies. |
The centerpiece in their model is a collector service daemon. You can customize it with various receiver, pipeline, and exporter component modules to suit your needs. You can also collect data from different telemetry sources or in different formats, normalize and/or filter it, and then send it to different data sinks for analysis and visualization.
We wanted a way to let users capture their Trace2 data and send it to an OpenTelemetry-compatible data sink, so we created an open source trace2receiver receiver component that you can add to your custom collector. With this new receiver component your collector can listen for Trace2 data from Git commands, translate it into a common format (such as OTLP), and relay it to a local or cloud-based visualization tool.
Want to jump in and build and run your own custom collector using trace2receiver? See the project documentation for all the tool installation and platform-specific setup you’ll need to do.
|
If you want a very quick start, I’ve created an open source sample collector that uses the trace2receiver component. It contains a ready-to-go sample collector, complete with basic configuration and platform installers. This will let you kick the tires with minimal effort. Just plug in your favorite data sink/cloud provider, build it, run one of the platform installers, and start collecting data. See the README for more details.
We can use trace2receiver to collect Git telemetry data for two orthogonal purposes. First, we can dive into an individual command from start to finish and see where time is spent. This is especially important when a Git command spawns a (possibly nested) series of child commands, which OpenTelemetry calls a “distributed trace.” Second, we can aggregate data over time from different users and machines, compute summary metrics such as average command times, and get a high level picture of how Git is performing at scale, plus perceived user frustration and opportunities for improvement. We’ll look at each of these cases in the following sections.
Let’s start with distributed tracing. The CNCF defines distributed tracing as a way to track a request through a distributed system. That’s a broader definition than we need here, but the concepts are the same: We want to track the flow within an individual command and/or the flow across a series of nested Git commands.
I previously wrote about Trace2, how it works, and how we can use it to interactively study the performance of an individual command, like git status, or a series of nested commands, like git push which might spawn six or seven helper commands behind the scenes. When Trace2 was set to log directly to the console, we could watch in real-time as commands were executed and see where the time was spent.
This is essentially equivalent to an OpenTelemetry distributed trace. What the trace2receiver does for us here is map the Trace2 event stream into a series of OpenTelemetry “spans” with the proper parent-child relationships. The transformed data can then be forwarded to a visualization tool or database with a compatible OpenTelemetry exporter.
Let’s see what happens when we do this on an instance of the torvalds/linux.git repository.
The following image shows data for a git fetch command using a local instance of the SigNoz observability tools. My custom collector contained a pipeline to route data from the trace2receiver component to an exporter component that sent data to SigNoz.
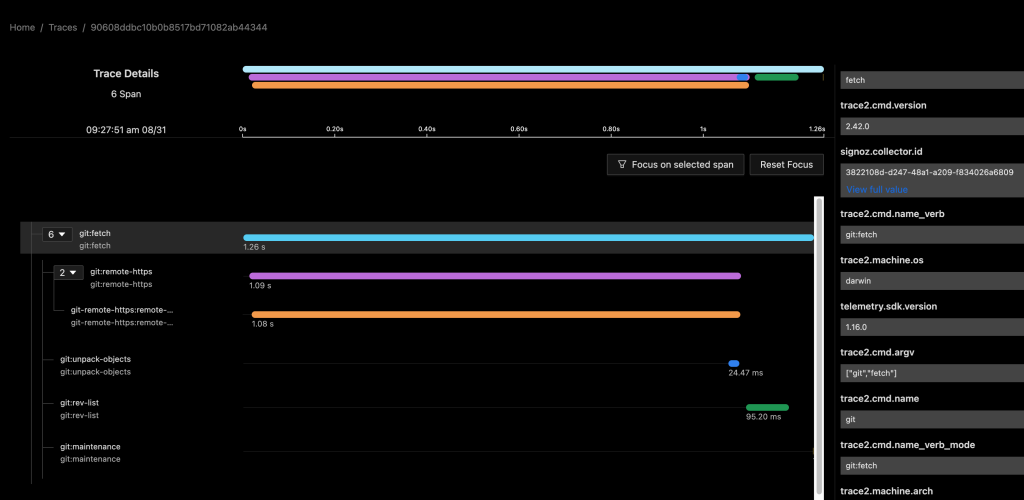
I configured my custom collector to send data to two exporters, so we can see the same data in an Application Insights database. This is possible and simple because of the open standards supported by OpenTelemetry.
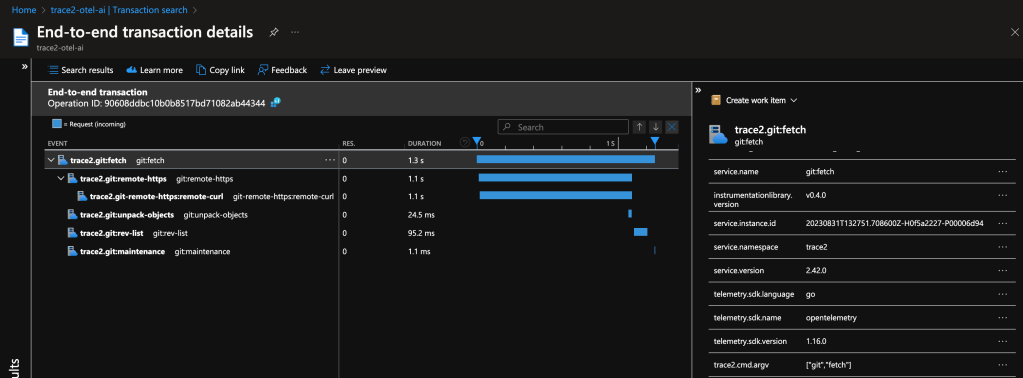
Both examples show a distributed trace of git fetch. Notice the duration of the top-level command and of each of the various helper commands that were spawned by Git.
This graph tells me that, for most of the time, git fetch was waiting on git-remote-https (the grandchild) to receive the newest objects. It also suggests that the repository is well-structured, since git maintenance runs very quickly. We likely can’t do very much to improve this particular command invocation, since it seems fairly optimal already.
As a long-time Git expert, I can further infer that the received packfile was small, because Git unpacked it (and wrote individual loose objects) rather than writing and indexing a new packfile. Even if your team doesn’t yet have the domain experts to draw detailed insights from the collected data, these insights could help support engineers or outside Git experts to better interpret your environment.
In this example, the custom collector was set to report dl:summary level telemetry, so we only see elapsed process times for each command. In the next example, we’ll crank up the verbosity to see what else we can learn.
The following images show data for git status in SigNoz. In the first image, the FSMonitor and Untracked Cache features are turned off. In the second image, I’ve turned on FSMonitor. In the third, I’ve turned on both. Let’s see how they affect Git performance. Note that the horizontal axis is different in each image. We can see how command times decreased from 970 to 204 to 40 ms as these features were turned on.
In these graphs, the detail level was set to dl:verbose, so the collector also sent region-level details.
The git:status span (row) shows the total command time. The region(...) spans show the major regions and nested sub-regions within the command. Basically, this gives us a fuller accounting of where time was spent in the computation.
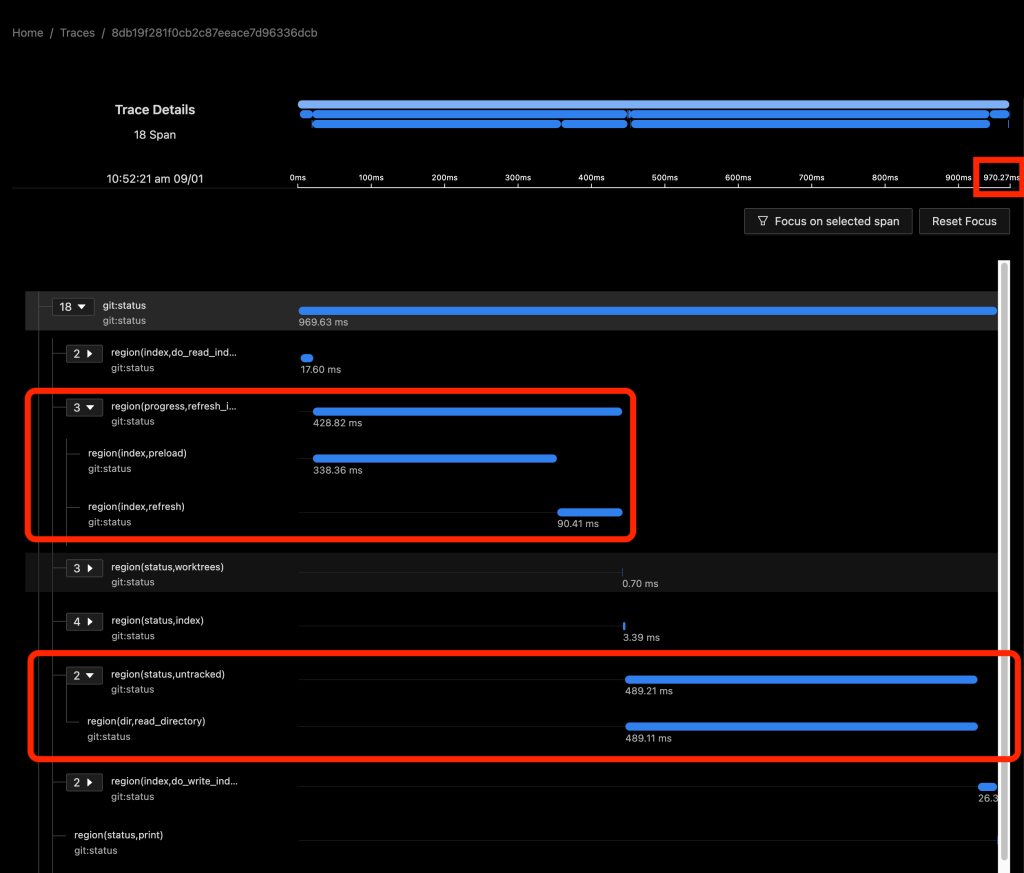
The total command time here was 970 ms.
In the above image, about half of the time (429 ms) was spent in region(progress,refresh_index) (and the sub-regions within it) scanning the worktree for recently modified files. This information will be used later in region(status,worktree) to compute the set of modified tracked files.
The other half (489 ms) was in region(status,untracked) where Git scans the worktree for the existence of untracked files.
As we can see, on large repositories, these scans are very expensive.
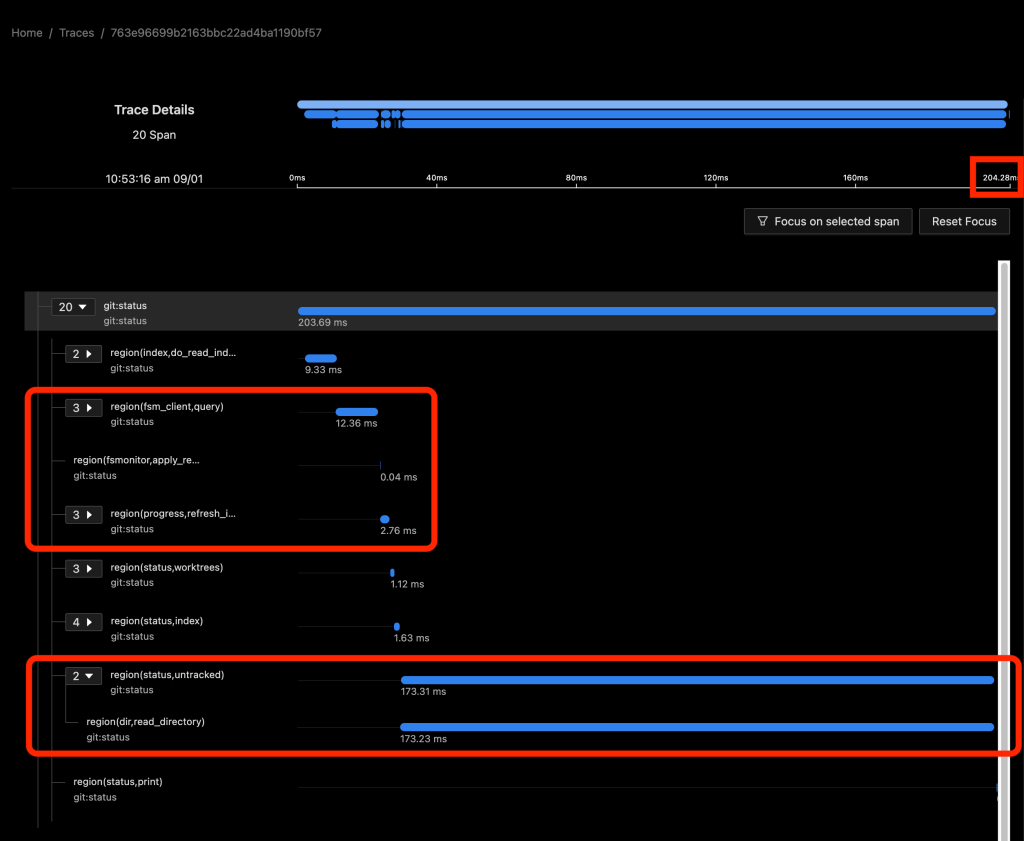
In the above image, FSMonitor was enabled. The total command time here was reduced from 970 to 204 ms.
With FSMonitor, Git doesn’t need to scan the disk to identify the recently modified files; it can just ask the FSMonitor daemon, since it already knows the answer.
Here we see a new region(fsm_client,query) where Git asks the daemon and a new region(fsmonitor,apply_results) where Git uses the answer to update its in-memory data structures. The original region(progress,refresh_index) is still present, but it doesn’t need to do anything. The time for this phase has been reduced from 429 to just 15 ms.
FSMonitor also helped reduce the time spent in region(status,untracked) from 489 to 173 ms, but it is still expensive. Let’s see what happens when we enable both and let FSMonitor and the untracked cache work together.

In the above image, FSMonitor and the Untracked Cache were both turned on. The total command time was reduced to just 40 ms.
This gives the best result for large repositories. In addition to the FSMonitor savings, the time in region(status,untracked) drops from 173 to 12 ms.
This is a massive savings on a very frequently run command.
For more information on FSMonitor and Untracked Cache and an explanation of these major regions, see my earlier FSMonitor article.
Looking at individual commands is valuable, but it’s only half the story. Sometimes we need to aggregate data from many command invocations across many users, machines, operating systems, and repositories to understand which commands are important, frequently used, or are causing users frustration.
This analysis can be used to guide future investments. Where is performance trending in the monorepo? How fast is it getting there? Do we need to take preemptive steps to stave off a bigger problem? Is it better to try to speed up a very slow command that is used maybe once a year or to try to shave a few milliseconds off of a command used millions of times a day? We need data to help us answer these questions.
When using Git on large monorepos, users may experience slow commands (or rather, commands that run more slowly than they were expecting). But slowness can be very subjective. So we need to be able to measure the performance that they are seeing, compare it with their peers, and inform the priority of a fix. We also need enough context so that we can investigate it and answer questions like: Was that a regular occurrence or a fluke? Was it a random network problem? Or was it a fetch from a data center on the other side of the planet? Is that slowness to be expected on that class of machine (laptop vs server)? By collecting and aggregating over time, we were able to confidently answer these kinds of questions.
Let’s take a look at what the raw telemetry looks like when it gets to a data sink and see what we can learn from the data.
We saw earlier that my custom collector was sending data to both Azure and SigNoz, so we should be able to look at the data in either. Let’s switch gears and use my Azure Application Insights (AppIns) database here. There are many different data sink and visualization tools, so the database schema may vary, but the concepts should transcend.
Earlier, I showed the distributed trace of a git fetch command in the Azure Portal. My custom collector is configured to send telemetry data to an Application Insights (AppIns) database and we can use the Azure Portal to query the data. However, I find the Azure Data Explorer a little easier to use than the portal, so let’s connect Data Explorer to my AppIns database. From Data Explorer, I’ll run my queries and let it automatically pull data from my AppIns database.
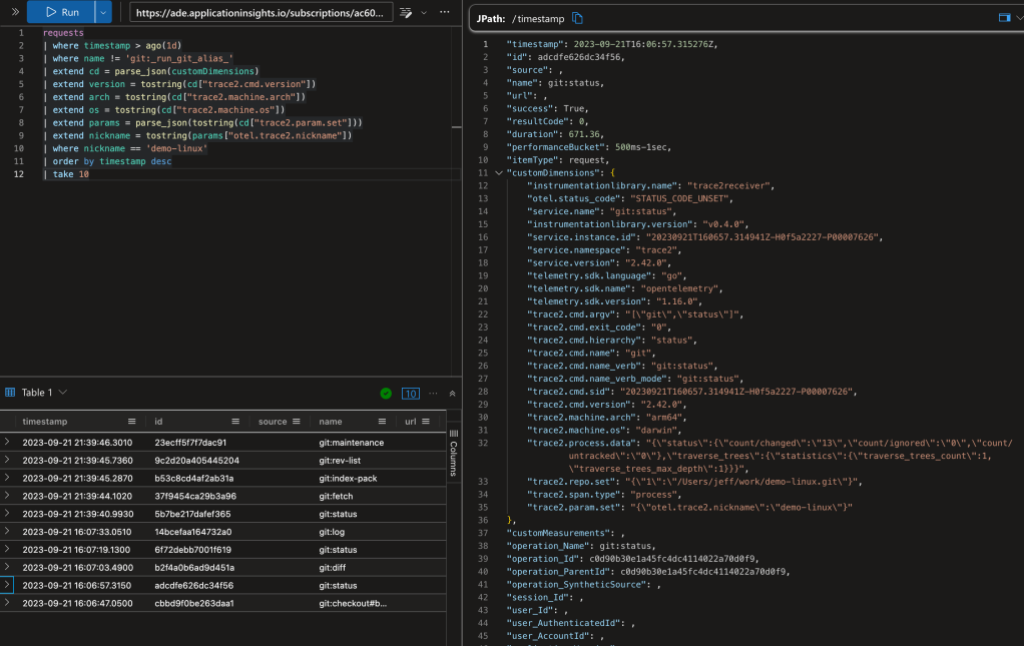
The above image shows a Kusto query on the data. In the top-left panel I’ve asked for the 10 most-recent commands on any repository with the “demo-linux” nickname (I’ll explain nicknames later in this post). The bottom-left panel shows (a clipped view of) the 10 matching database rows. The panel on the right shows an expanded view of the ninth row.
The AppIns database has a legacy schema that predates OpenTelemetry, so some of OpenTelemetry fields are mapped into top-level AppIns fields and some are mapped into the customDimensions JSON object/dictionary. Additionally, some types of data records are kept in different database tables. I’m going to gloss over all of that here and point out a few things in the data.
The record in the expanded view shows a git status command. Let’s look at a few rows here. In the top-level fields:
name is git:status.duration was 671 ms. (AppIns tends to use milliseconds.)In the customDimensions fields:
"trace2.cmd.argv")."trace2.machine.arch" and "trace2.machine.os" fields show that it ran on an arm64 mac."trace2.process.data"["status"]["count/changed"] shows that it found 13 modified files in the working directory.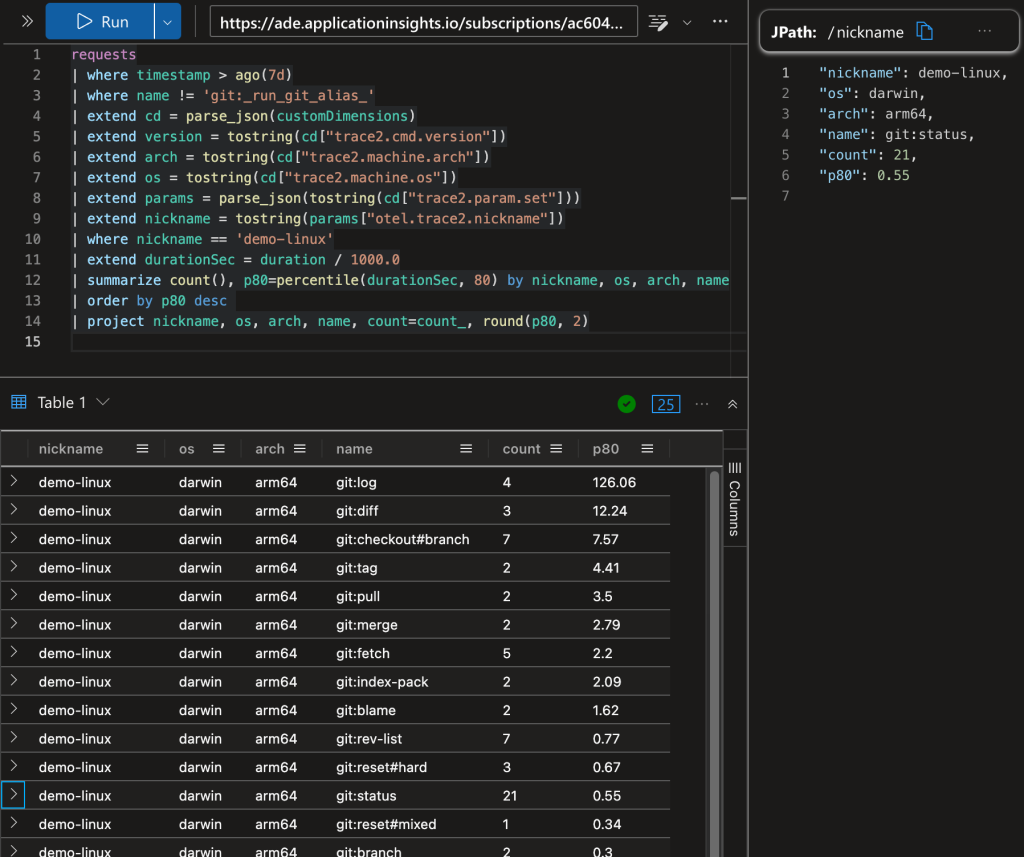
The above image shows a Kusto query with command counts and the P80 command duration grouped by repository, operating system, and processor. For example, there were 21 instances of git status on “demo-linux” and 80% of them took less than 0.55 seconds.

The above image shows a comparison of git status times between “demo-linux” and my “demo-chromium” clone of chromium/chromium.git.
Without going too deep into Kusto queries or Azure, the above examples are intended to demonstrate how you can focus on different aspects of the available data and motivate you to create your own investigations. The exact layout of the data may vary depending on the data sink that you select and its storage format, but the general techniques shown here can be used to build a better understanding of Git regardless of the details of your setup.
Your custom collector will send all of your Git telemetry data to your data sink. That is a good first step. However, you may want to partition the data by various criteria, rather than reporting composite metrics. As we saw above, the performance of git status on the “demo-linux” repository is not really comparable with the performance on the “demo-chromium” repository, since the Chromium repository and working directory is so much larger than the Linux repository. So a single composite P80 value for git:status across all repositories might not be that useful.
Let’s talk about some partitioning strategies to help you get more from the data.
Earlier, we used a repo nickname to distinguish between our two demo repositories. We can tell Git to send a nickname with the data for every command and we can use that in our queries.
The way I configured each client machine in the previous example was to:
otel.trace2.nickname is the name of the Git config key in the collector’s filter.yml file.trace2.configParams to tell Git to send all Git config values with the otel.trace2.* prefix to the telemetry stream.otel.trace2.nickname to the appropriate nickname (like “demo-linux” or “demo-chromium” in the earlier example) in each working directory.Telemetry will arrive at the data sink with trace2.param.set["otel.trace2.nickname"] in the meta data. We can then use the nickname to partition our Kusto queries.
There’s nothing magic about the otel.trace2.* prefix. You can also use existing Git config values or create some custom ones.
For example, you could globally set trace2.configParams to 'otel.trace2.*,core.fsmonitor,core.untrackedcache' and let Git send the repo nickname and whether the FSMonitor and untracked cache features were enabled.
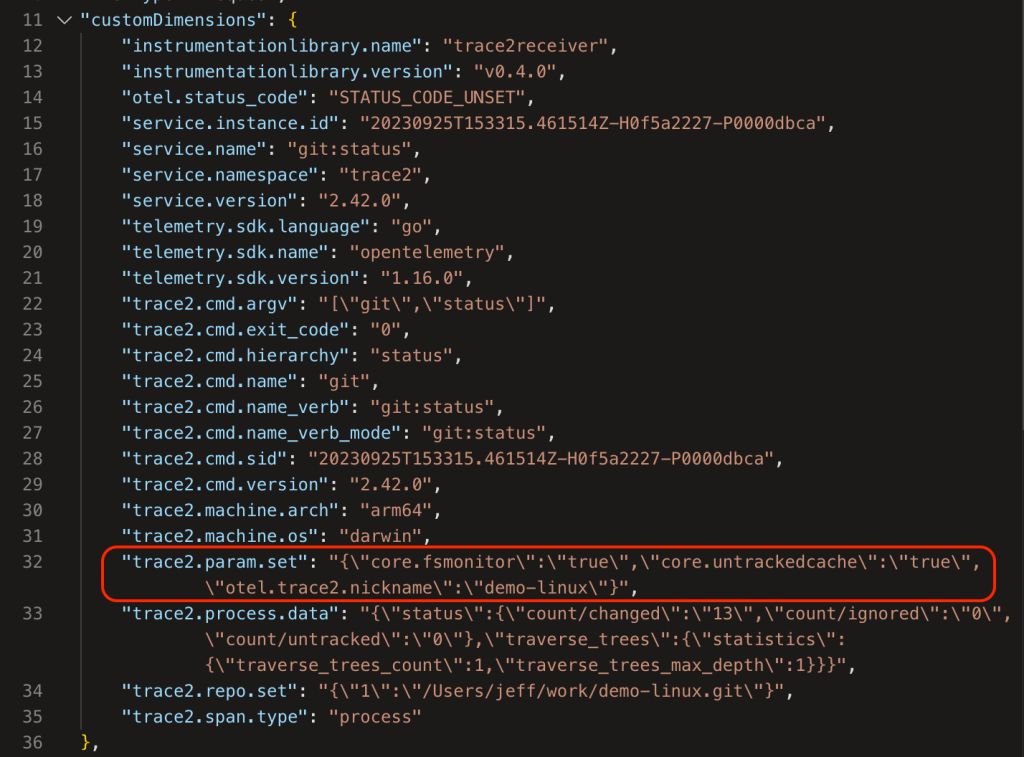
You could also set a global config value to define user cohorts for some A/B testing or a machine type to distinguish laptops from build servers.
These are just a few examples of how you might add fields to the telemetry stream to partition the data and help you better understand Git performance.
When exploring your own Git data, it’s important to be aware of several limitations and caveats that may skew your analysis of the performance or behaviors of certain commands. I’ve listed a few common issues below.
Laptops can go to sleep or hibernate without notice. If a Git command is running when the laptop goes to sleep and finishes after the laptop is resumed, Git will accidentally include the time spent sleeping in the Trace2 event data because Git always reports the current time in each event. So you may see an arbitrary span with an unexpected and very large delay.1
So if you occasionally find a command that runs for several days, see if it started late on a Friday afternoon and finished first thing Monday morning before sounding any alarms.
Git lets you define hooks to be run at various points in the lifespan of a Git command. Hooks are typically shell scripts, usually used to test a pre-condition before allowing a Git command to proceed or to ensure that some system state is updated before the command completes. They do not emit Trace2 telemetry events, so we will not have any visibility into them.
Since Git blocks while the hook is running, the time spent in the hook will be attributed to the process span (and a child span, if enabled).
If a hook shell script runs helper Git commands, those Git child processes will inherit the span context for the parent Git command, so they will appear as immediate children of the outer Git command rather than the missing hook script process. This may help explain where time was spent, but it may cause a little confusion when you try to line things up.
Some Git commands have a (sometimes unexpected) interactive component:
git commit will start and wait for your editor to close before continuing.git fetch or git push might require a password from the terminal or an interactive credential helper.git log or git blame can automatically spawn a pager and may cause the foreground Git command to block on I/O to the pager process or otherwise just block until the pager exits.In all of these cases, it can look like it took hours for a Git command to complete because it was waiting on you to respond.
We can use the dl:process or dl:verbose detail levels to gain insight into hidden hooks, your editor, or other interactive processes.
The trace2receiver creates child(...) spans from Trace2 child_start and child_exit event pairs. These spans capture the time that Git spent waiting for each child process. This works whether the child is a shell script or a helper Git command. In the case of a helper command, there will also be a process span for the Git helper process (that will be slightly shorter because of process startup overhead), but in the case of a shell script, this is usually the only hint that an external process was involved.
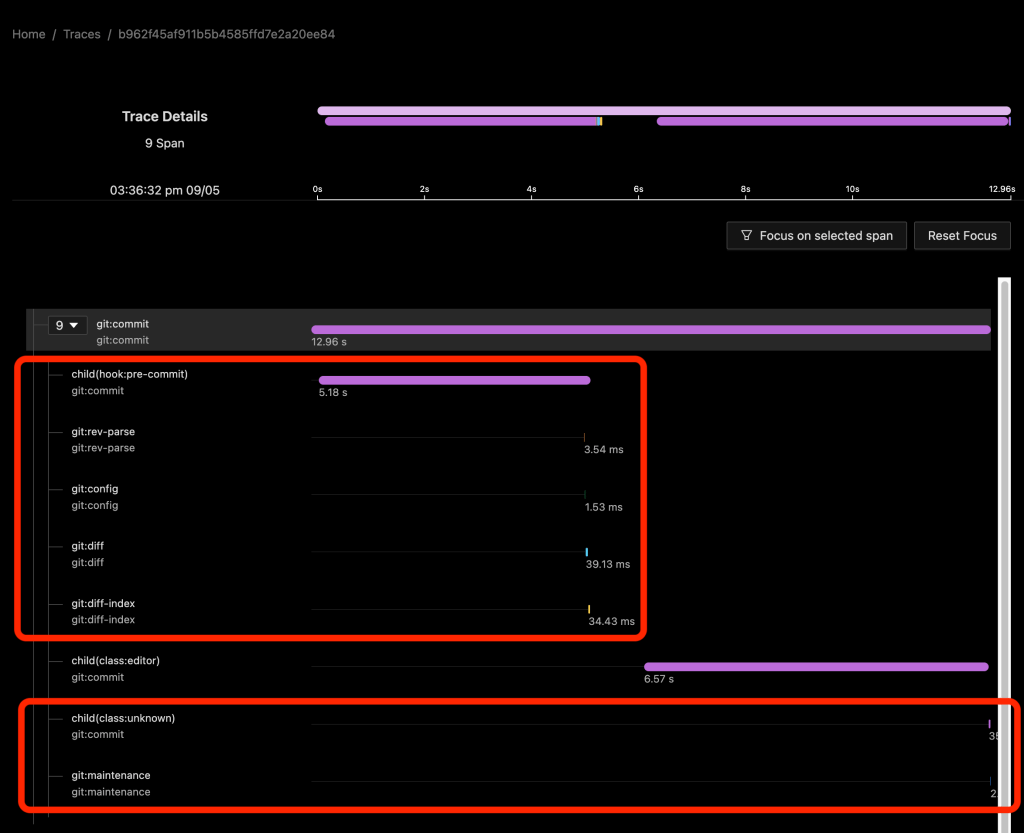
In the above image we see a git commit command on a repository with a child(hook:pre-commit) span shows the time spent waiting for the hook to run. Since Git blocks on the hook, we can infer that the hook itself did something (sleep) for about five seconds and then ran four helper commands. The process spans for the helper commands appear to be direct children of the git:commit process span rather than of a synthetic shell script process span or of the child span.
From the child(class:editor) span we can also see that an editor was started and it took almost seven seconds for it to appear on the screen and for me to close it. We don’t have any other information about the activity of the editor besides the command line arguments that we used to start it.
Finally, I should mention that when we enable dl:process or dl:verbose detail levels, we will also get some child spans that may not be that helpful. Here the child(class:unknown) span refers to the git maintenance process immediately below it.2
Once you have some telemetry data you can:
git maintenance to keep your repositories healthy and efficient.You might also see what other large organizations are saying:
My goal in this article was to help you start collecting Git performance data and present some examples of how someone might use that data. Git performance is often very dependent upon the data-shape of your repository, so I can’t make a single, sweeping recommendation that will help everyone. (Try Scalar)
But with the new trace2receiver component and an OpenTelemetry custom collector, you should now be able to collect performance data for your repositories and begin to analyze and find your organization’s Git pain points. Let that guide you to making improvements — whether that is upstreaming a new feature into Git, adding a network cache server to reduce latency, or making better use of some of the existing performance features that we’ve created.
The trace2receiver component is open source and covered by the MIT License, so grab the code and try it out.
See the contribution guide for details on how to contribute.
trace2receiver does not support that. ↩
child_start event is labeled in the Trace2 data stream. Think of it as “unclassified”. Git tries to classify child processes when it creates them, for example “hook” or “editor”, but some call-sites in Git have not been updated to pass that information down, so they are labeled as unknown. ↩
Learn how GitHub built an accessible, multi-terminal-safe ASCII animation for the Copilot CLI using custom tooling, ANSI color roles, and advanced terminal engineering.

User feedback led us to clean up outdated mitigations. See why observability and lifecycle management are critical for defense systems.

GitHub is introducing post-quantum secure key exchange methods for SSH access to better protect Git data in transit.