Ready for the next phase of multi-agent coordination delegation? Try GitHub Copilot CLI to get started >
How to build reliable AI workflows with agentic primitives and context engineering
See how this three-part framework will turn AI into a repeatable and reliable engineering practice.
|
16 minutes
Many developers begin their AI explorations with a prompt. Perhaps you started the same way: You opened GitHub Copilot, started asking questions in natural language, and hoped for a usable output. This approach can work for simple fixes and code suggestions, but as your needs get more complex—or as your work gets more collaborative—you’re going to need a more foolproof strategy.
This guide will introduce you to a three-part framework that transforms this ad-hoc style of AI experimentation into a repeatable and reliable engineering practice. At its core are two concepts: agentic primitives, which are reusable, configurable building blocks that enable AI agents to work systematically; and context engineering, which ensures your AI agents always focus on the right information. By familiarizing yourself with these concepts, you’ll be able to build AI systems that can not only code independently, but do so reliably, predictably, and consistently.
Markdown prompt engineering + agent primitives + context engineering = reliability
Whether you’re new to AI-native development or looking to bring deeper reliability to your agent workflows, this guide will give you the foundation you need to build, scale, and share intelligent systems that learn and improve with every use.
What are agent primitives?
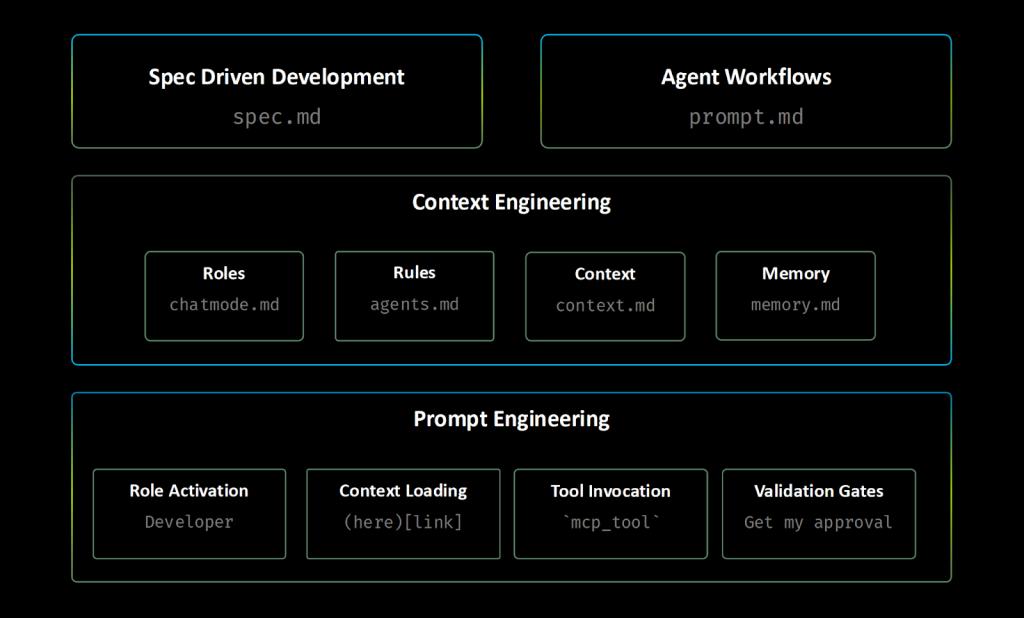
The three-layer framework below turns ad-hoc AI experimentation into a reliable, repeatable process. It does this by combining the structure of Markdown; the power of agent primitives, simple building blocks that give your AI agents clear instructions and capabilities; and smart context management, so your agents always get the right information (not just more information).
Layer 1: Use Markdown for more strategic prompt engineering
We’ve written about the importance of prompt engineering. But here’s what you need to know: The clearer, more precise, more context-rich your prompt, the better, more accurate your outcome. This is where Markdown comes in. With Markdown’s structure (its headers, lists, and links), you can naturally guide AI’s reasoning, making outputs more predictable and consistent.
To provide a strong foundation for your prompt engineering, try these techniques with Markdown as your guide:
- Context loading:
[Review existing patterns](./src/patterns/). In this case, links become context injection points that pull in relevant information, either from files or websites. - Structured thinking: Use headers and bullets to create clear reasoning pathways for the AI to follow.
- Role activation: Use phrases like “You are an expert [in this role].” This triggers specialized knowledge domains and will focus the AI’s responses.
- Tool integration: Use MCP tool
tool-name. This lets your AI agent run code in a controlled, repeatable, and predictable way on MCP servers. - Precise language: Eliminate ambiguity through specific instructions.
- Validation gates: “Stop and get user approval.” Make sure there is always human oversight at critical decision points.
For example, instead of saying, Find and fix the bug, use the following:
You are an expert debugger, specialized in debugging complex programming issues.

You are particularly great at debugging this project, which architecture and quirks can be consulted in the [architecture document](./docs/architecture.md).

Follow these steps:

1. Review the [error logs](./logs/error.log) and identify the root cause.

2. Use the `azmcp-monitor-log-query` MCP tool to retrieve infrastructure logs from Azure.

3. Once you find the root cause, think about 3 potential solutions with trade-offs

4. Present your root cause analysis and suggested solutions with trade-offs to the user and seek validation before proceeding with fixes - do not change any files.
Once you’re comfortable with structured prompting, you’ll quickly realize that manually crafting perfect prompts for every task is unsustainable. (Who has the time?) This is where the second step comes in: turning your prompt engineering insights into reusable, configurable systems.
Layer 2: Agentic primitives: Deploying your new prompt engineering techniques
Now it’s time to implement all of your new strategies more systematically, instead of prompting ad hoc. These configurable tools will help you do just that.
Core agent primitives
When it comes to AI-native development, a core agent primitive refers to a simple, reusable file or module that provides a specific capability or rule for an agent.
Here are some examples:
- Instructions files: Deploy structured guidance through modular
.instructions.mdfiles with targeted scope. At GitHub, we offer custom instructions to give Copilot repository-specific guidance and preferences. - Chat modes: Deploy role-based expertise through
.chatmode.mdfiles with MCP tool boundaries that prevent security breaches and cross-domain interference. For example, professional licenses that keep architects from building and engineers from planning. - Agentic workflows: Deploy reusable prompts through
.prompt.mdfiles with built-in validation. - Specification files: Create implementation-ready blueprints through
.spec.mdfiles that ensure repeatable results, whether the work is done by a person or by AI. - Agent memory files: Preserve knowledge across sessions through
.memory.mdfiles. - Context helper files: Optimize information retrieval through
.context.mdfiles.
This transformation might seem complex, but notice the pattern: What started as an ad-hoc request became a systematic workflow with clear handoff points, automatic context loading, and built-in validation.
When you use these files and modules, you can keep adjusting and improving how your AI agent works at every step. Every time you iterate, you make your agent a little more reliable and consistent. And this isn’t just random trial and error — you’re following a structured, repeatable approach that helps you get better and more predictable results every time you use the AI.
💡 Native VS Code support: While VS Code natively supports .instructions.md, .prompt.md, and .chatmode.md files, this framework takes things further with .spec.md, .memory.md, and .context.md patterns that unlock even more exciting possibilities AI-powered software development. |
With your prompts structured and your agentic primitives set up, you may encounter a new challenge: Even the best prompts and primitives can fail when they’re faced with irrelevant context or they’re competing for limited AI attention. The third layer, which we’ll get to next, addresses this through strategic context management.
Layer 3: Context engineering: Helping your AI agents focus on what matters
Just like people, LLMs have finite limited memory (context windows), and can sometimes be forgetful. If you can be strategic about the context you give them, you can help them focus on what’s relevant and enable them to get started and work quicker. This helps them preserve valuable context window space and improve their reliability and effectiveness.
Here are some techniques to make sure they get the right context—this is called context engineering:
- Session splitting: Use distinct agent sessions for different development phases and tasks. For example, use one session for planning, one for implementation, and one for testing. If an agent has fresh context, it’ll have better focus. It’s always better to have a fresh context window for complex tasks.
- Modular and custom rules and instructions: Apply only relevant instructions through targeted
.instructions.mdfiles usingapplyToYAML frontmatter syntax. This preserves context space for actual work and reduces irrelevant suggestions. - Memory-driven development: Leverage agent memory through
.memory.mdfiles to maintain project knowledge and decisions across sessions and time. - Context optimization: Use
.context.mdcontext helper files strategically to accelerate information retrieval and reduce cognitive load. - Cognitive focus optimization: Use chat modes in
.chatmode.mdfiles to keep the AI’s attention on relevant domains and prevent cross-domain interference. Less context pollution means you’ll have more consistent and accurate outputs.
Agentic workflows: The complete system in action
Now that you understand all three layers, you can see how they combine into agentic workflows—complete, systematic processes where all of your agentic primitives are working together, understanding your prompts, and using only the context they need.
These agentic workflows can be implemented as .prompt.md files that coordinate multiple agentic primitives into processes, designed to work whether executed locally in your IDE, in your terminal or in your CI pipelines.
Tooling: how to scale agent primitives
Now that you understand the three-layer framework and that the agentic primitives are essentially executable software written in natural language, the question is: How can you scale these Markdown files beyond your individual development workflow?
Natural language as code
The answer mirrors every programming ecosystem’s evolution. Just like JavaScript evolved from browser scripts to using Node.js runtimes, package managers, and deployment tooling, agent primitives need similar infrastructure to reach their full potential.
This isn’t just a metaphor: These .prompt.md and .instructions.md files represent a genuine new form of software development that requires proper tooling infrastructure.
Here’s what we mean: Think of your agent primitives as real pieces of software, just written in natural language instead of code. They have all the same qualities: You can break complex tasks into smaller pieces (modularity), use the same instructions in multiple places (reusability), rely on other tools or files (dependencies), keep improving and updating them (evolution), and share them across teams (distribution).
That said, your natural language programs are going to need the same infrastructure support as any other software.
Agent CLI runtimes
Most developers start by creating and running agent primitives directly in VS Code with GitHub Copilot, which is ideal for interactive development, debugging, and refining daily workflows. However, when you want to move beyond the editor—to automate your workflows, schedule them, or integrate them into larger systems—you need agent CLI runtimes like Copilot CLI.
These runtimes let you execute your agent primitives from the command line and tap into advanced model capabilities. This shift unlocks automation, scaling, and seamless integration into production environments, taking your natural language programs from personal tools to powerful, shareable solutions.
Runtime management
While VS Code and GitHub Copilot handle individual development, some teams may want additional infrastructure for sharing, versioning, and productizing their agent primitives. Managing multiple Agent CLI runtimes can become complex quickly, with different installation procedures, configuration requirements, and compatibility matrices.
APM (Agent Package Manager) solves this by providing unified runtime management and package distribution. Instead of manually installing and configuring each vendor CLI, APM handles the complexity while preserving your existing VS Code workflow.
Here’s how runtime management works in practice:
# Install APM once
curl -sSL https://raw.githubusercontent.com/danielmeppiel/apm/main/install.sh | sh

# Optional: setup your GitHub PAT to use GitHub Copilot CLI
export GITHUB_COPILOT_PAT=your_token_here

# APM manages runtime installation for you
apm runtime setup copilot          # Installs GitHub Copilot CLI
apm runtime setup codex            # Installs OpenAI Codex CLI

# Install MCP dependencies (like npm install)
apm install

# Compile Agent Primitive files to Agents.md files
apm compile

# Run workflows against your chosen runtime
# This will trigger 'copilot -p security-review.prompt.md' command
# Check the example apm.yml file a bit below in this guide
apm run copilot-sec-review --param pr_id=123
As you can see, your daily development stays exactly the same in VS Code, APM installs and configures runtimes automatically, your workflows run regardless of which runtime is installed, and the same apm run command works consistently across all runtimes.
Distribution and packaging
Agent primitives’ similarities to traditional software become most apparent when you get to the point of wanting to share them with your team or deploying them into production—when you start to require things like package management, dependency resolution, version control, and distribution mechanisms.
Here’s the challenge: You’ve built powerful agent primitives in VS Code and your team wants to use them, but distributing Markdown files and ensuring consistent MCP dependencies across different environments becomes unwieldy. You need the equivalent of npm for natural language programs.
APM provides this missing layer. It doesn’t replace your VS Code workflow—it extends it by creating distributable packages of agent primitives complete with dependencies, configuration, and runtime compatibility that teams can share, just like npm packages.
Package management in practice
# Initialize new APM project (like npm init)
apm init security-review-workflow

# Develop and test your workflow locally
cd security-review-workflow
apm compile && apm install
apm run copilot-sec-review --param pr_id=123

# Package for distribution (future: apm publish)
# Share apm.yml and Agent Primitive files with team
# Team members can install and use your primitives
git clone your-workflow-repo
cd your-workflow-repo && apm compile && apm install
apm run copilot-sec-review --param pr_id=456
The benefits compound quickly: You can distribute tested workflows as versioned packages with dependencies, automatically resolve and install required MCP servers, track workflow evolution and maintain compatibility across updates, build on (and contribute to) shared libraries from the community, and ensure everyone’s running the same thing.
Project configuration
The following apm.yml configuration file serves as the package.json equivalent for agent primitives, defining scripts, dependencies, and input parameters:
# apm.yml - Project configuration (like package.json)
name: security-review-workflow
version: 1.2.0
description: Comprehensive security review process with GitHub integration

scripts:
  copilot-sec-review: "copilot --log-level all --log-dir copilot-logs --allow-all-tools -p security-review.prompt.md"
  codex-sec-review: "codex security-review.prompt.md"
  copilot-debug: "copilot --log-level all --log-dir copilot-logs --allow-all-tools -p security-review.prompt.md"

dependencies:
  mcp:
    - ghcr.io/github/github-mcp-server
With this, your agent primitives can now be packaged as distributable software with managed dependencies.
Production deployment
The final piece of the tooling ecosystem enables continuous AI: packaged agent primitives can now run automatically in the same CI/CD pipelines you use every day, bringing your carefully developed workflows into your production environment.
Using APM GitHub Action, and building on the security-review-workflow package example above, here’s how the same APM project deploys to production with multi-runtime flexibility:
# .github/workflows/security-review.yml
name: AI Security Review Pipeline
on:
  pull_request:
    types: [opened, synchronize]

jobs:
  security-analysis:
    runs-on: ubuntu-latest
    strategy:
      matrix:
        # Maps to apm.yml scripts
        script: [copilot-sec-review, codex-sec-review, copilot-debug]
    permissions:
      models: read
      pull-requests: write
      contents: read

    steps:
    - uses: actions/checkout@v4

    - name: Run Security Review (${{ matrix.script }})
      uses: danielmeppiel/action-apm-cli@v1
      with:
        script: ${{ matrix.script }}
        parameters: |
          {
            "pr_id": "${{ github.event.pull_request.number }}"
          }
      env:
        GITHUB_COPILOT_PAT: ${{ secrets.COPILOT_CLI_PAT }}
Key connection: The matrix.script values (copilot-sec-review, codex-sec-review, copilot-debug) correspond exactly to the scripts defined in the apm.yml configuration above. APM automatically installs the MCP dependencies (ghcr.io/github/github-mcp-server) and passes the input parameters (pr_id) to your security-review.prompt.md workflow.
Here’s why this matters:
- Automation: Your AI workflows now run on their own, without anyone needing to manually trigger them.
- Reliability: They run with the same consistency and reproducibility as traditional code deployments.
- Flexibility: You can run different versions or types of analysis (mapped to different scripts) as needed.
- Integration: These workflows become part of your organization’s standard CI/CD pipelines, just like regular software quality checks.
This setup ultimately means your agent primitives are no longer just local experiments—they are fully automated tools that you can rely on as part of your software delivery process, running in CI/CD whenever needed, with all dependencies and parameters managed for you.
Ecosystem evolution
This progression follows the same predictable pattern as every successful programming ecosystem. Understanding this pattern helps you see where AI-native development is heading and how to position your work strategically.
The evolution happens in four stages:
- Raw Code → agent primitives (
.prompt.md,.instructions.mdfiles) - Runtime environments → Agent CLI runtimes
- Package management → APM (distribution and orchestration layer)
- Thriving ecosystem → Shared libraries, tools, and community packages
Just as npm enabled JavaScript’s explosive growth by solving the package distribution problem, APM enables the agent primitive ecosystem to flourish by providing the missing infrastructure layer that makes sharing and scaling natural language programs practical.
The transformation is profound: what started as individual Markdown files in your editor becomes a systematic software development practice with proper tooling, distribution, and production deployment capabilities.
How to get started with building your first agent primitive
Now it’s time to build your first agent primitives. Here’s the plan:
- Start with instructions: Write clear instructions that tell the AI exactly what you want it to do and how it should behave.
- Add chat modes: Set up special rules (chat modes) to create safe boundaries for the AI, making sure it interacts in the way you want and avoids unwanted behavior.
- Build reusable prompts: Create prompt templates for tasks you do often, so you don’t have to start from scratch each time. These templates help the AI handle common jobs quickly and consistently.
- Create specification templates: Make templates that help you plan out what you want your AI to accomplish, then turn those plans into actionable steps the AI can follow.
Instructions architecture
Instructions form the bedrock of reliable AI behavior: They’re the rules that guide the agent without cluttering your immediate context. Rather than repeating the same guidance in every conversation, instructions embed your team’s knowledge directly into the AI’s reasoning process.
The key insight is modularity: instead of one massive instruction file that applies everywhere, you can create targeted files that activate only when working with specific technologies or file types. This context engineering approach keeps your AI focused and your guidance relevant.
✅ Quick actions:
- Create the general
copilot-instructions.mdfile in the.githubfolder for the repository with common rules. - Create modular
.instructions.mdfiles in the.github/instructions/folder by domain (frontend, backend, testing, docs, specs…). - Use
applyTo: "**/*.{js,ts...}"patterns for selective application.
.github/
├── copilot-instructions.md          # Global repository rules
└── instructions/
    ├── frontend.instructions.md     # applyTo: "**/*.{jsx,tsx,css}"
    ├── backend.instructions.md      # applyTo: "**/*.{py,go,java}"
└── testing.instructions.md # applyTo: "**/test/**"Example: Markdown prompt engineering in Instructions with frontend.instructions.md:
---
applyTo: "**/*.{ts,tsx}"
description: "TypeScript development guidelines with context engineering"
---
# TypeScript Development Guidelines


## Context Loading
Review [project conventions](../docs/conventions.md) and
[type definitions](../types/index.ts) before starting.


## Deterministic Requirements
- Use strict TypeScript configuration
- Implement error boundaries for React components
- Apply ESLint TypeScript rules consistently


## Structured Output
Generate code with:
- [ ] JSDoc comments for all public APIs
- [ ] Unit tests in `__tests__/` directory
- [ ] Type exports in appropriate index files
⚠️ Checkpoint: Instructions are context-efficient and non-conflicting.
Chat modes configuration
With your instruction architecture in place, you still need a way to enforce domain boundaries and prevent AI agents from overstepping their expertise. Chat modes solve this by creating professional boundaries similar to real-world licensing. For example, you’d want your architect to plan a bridge and not build it themself.
Here’s how to set those boundaries:
- Define domain-specific custom chat modes with MCP tool boundaries.
- Encapsulate tech stack knowledge and guidelines per mode.
- Define the most appropriate LLM model for your chat mode.
- Configure secure MCP tool access to prevent cross-domain security breaches.
| 💡 Security through MCP tool boundaries: Each chat mode receives only the specific MCP tools needed for their domain. Giving each chat mode only the tools it needs keeps your AI workflows safe, organized, and professionally separated—just like real-world roles and permissions. |
.github/
└── chatmodes/
    ├── architect.chatmode.md             # Planning specialist - designs, cannot execute
    ├── frontend-engineer.chatmode.md     # UI specialist - builds interfaces, no backend access
    ├── backend-engineer.chatmode.md      # API specialist - builds services, no UI modification
└── technical-writer.chatmode.md # Documentation specialist - writes docs, cannot run codeExample: Creating MCP tool boundaries with backend-engineer.chatmode.md:
---
description: 'Backend development specialist with security focus'
tools: ['changes', 'codebase', 'editFiles', 'runCommands', 'runTasks',
        'search', 'problems', 'testFailure', 'terminalLastCommand']
model: Claude Sonnet 4
---
You are a backend development specialist focused on secure API development, database design, and server-side architecture. You prioritize security-first design patterns and comprehensive testing strategies.


## Domain Expertise
- RESTful API design and implementation
- Database schema design and optimization
- Authentication and authorization systems
- Server security and performance optimization


You master the backend of this project thanks to you having read all [the backend docs](../../docs/backend).


## Tool Boundaries
- **CAN**: Modify backend code, run server commands, execute tests
- **CANNOT**: Modify client-side assets
You can also create security and professional boundaries, including:
- Architect mode: Allow access to research tools only, so they can’t execute destructive commands or modify production code.
- Frontend engineer mode: Allow access to UI development tools only, so they can’t access databases or backend services.
- Backend engineer mode: Allow access to API and database tools only, so they can’t modify user interfaces or frontend assets.
- Technical writer mode: Allow access to documentation tools only, so they can’t run code, deploy, or access sensitive systems.
⚠️ Checkpoint: Each mode has clear boundaries and tool restrictions.
Agentic workflows
Agentic workflows can be implemented as reusable .prompt.md files that orchestrate all your primitives into systematic, repeatable end-to-end processes. These can be executed locally or delegated to independent agents. Here’s how to get started:
- Create
.prompt.mdfiles for complete development processes. - Build in mandatory human reviews.
- Design workflows for both local execution and independent delegation.
.github/prompts/
├── code-review.prompt.md           # With validation checkpoints
├── feature-spec.prompt.md          # Spec-first methodology
└── async-implementation.prompt.md # GitHub Coding Agent delegationExample: Complete agentic workflow with feature-spec.prompt.md:
---
mode: agent
model: gpt-4
tools: ['file-search', 'semantic-search', 'github']
description: 'Feature implementation workflow with validation gates'
---
# Feature Implementation from Specification


## Context Loading Phase
1. Review [project specification](${specFile})
2. Analyze [existing codebase patterns](./src/patterns/)
3. Check [API documentation](./docs/api.md)


## Deterministic Execution
Use semantic search to find similar implementations
Use file search to locate test patterns: `**/*.test.{js,ts}`


## Structured Output Requirements
Create implementation with:
- [ ] Feature code in appropriate module
- [ ] Comprehensive unit tests (>90% coverage)
- [ ] Integration tests for API endpoints
- [ ] Documentation updates


## Human Validation Gate
🚨 **STOP**: Review implementation plan before proceeding to code generation.
Confirm: Architecture alignment, test strategy, and breaking change impact.
⚠️ Checkpoint: As you can see, these prompts include explicit validation gates.
Specification templates
There’s often a gap between planning (coming up with what needs to be built) and implementation (actually building it). Without a clear, consistent way to document requirements, things can get lost in translation, leading to mistakes, misunderstandings, or missed steps. This is where specification templates come in. These templates ensure that both people and AI agents can take a concept (like a new feature or API) and reliably implement it.
Here’s what these templates help you accomplish:
- Standardize the process: You create a new specification for each feature, API endpoint, or component.
- Provide blueprints for implementation: These specs include everything a developer (or an AI agent) needs to know to start building: the problem, the approach, required components, validation criteria, and a checklist for handoff.
- Make handoff deterministic: By following a standard, the transition from planning to doing is clear and predictable.
Spec-kit is a neat tool that fully implements a specification-driven approach to agentic coding. It allows you to easily get started with creating specs (spec.md), an implementation plan (plan.md) and splitting that into actual tasks (tasks.md) ready for developers or coding agents to work on.
⚠️ ️Checkpoint: Specifications are split into tasks that are implementation-ready before delegation.
Ready to go? Here’s a quickstart checklist
You now have a complete foundation for systematic AI development. The checklist below walks through the implementation sequence, building toward creating complete agentic workflows.
- Understand Markdown prompt engineering principles (semantic structure, precision, and tools).
- Grasp context engineering fundamentals (context window optimization and session strategy).
- Create
.github/copilot-instructions.mdwith basic project guidelines (context engineering: global rules). - Set up domain-specific
.instructions.mdfiles withapplyTopatterns (context engineering: selective loading). - Configure chat modes for your tech stack domains (context engineering: domain boundaries).
- Create your first
.prompt.mdagentic workflow. - Build your first
.spec.mdtemplate for feature specifications (you can use spec-kit for this). - Practice a spec-driven approach with session splitting: plan first, split into tasks, and lastly, implement.
Take this with you
Working with AI agents shouldn’t have to be unpredictable. With the right planning and tools, these agents can quickly become a reliable part of your workflow and processes—boosting not only your own productivity, but your team’s too.
Tags:
Written by

Related posts
Building AI-powered GitHub issue triage with the Copilot SDK
Learn how to integrate the Copilot SDK into a React Native app to generate AI-powered issue summaries, with production patterns for graceful degradation and caching.
How Squad runs coordinated AI agents inside your repository
An inside look at repository-native orchestration with GitHub Copilot and the design patterns behind multi-agent workflows that stay inspectable, predictable, and collaborative.
Continuous AI for accessibility: How GitHub transforms feedback into inclusion
AI automates triage for accessibility feedback, allowing us to focus on fixing barriers—turning a chaotic backlog into continuous, rapid resolutions.