Enabling branch deployments through IssueOps with GitHub Actions
What if developers want to leverage branch deployments but don’t have a full ChatOps stack integrated with their repositories? We wanted to set out to find a way for all developers to be able to take advantage of branch deployments with ease, right from their GitHub repository, and so the branch-deploy Action was born!

At GitHub, the branch deploy model is ubiquitous and it is the standard way we ship code to production, and it has been for years. We released details about how we perform branch deployments with ChatOps all the way back in 2015.
We are able to use ChatOps to perform branch deployments for most of our repositories, but there are a few situations where ChatOps simply won’t work for us. What if developers want to leverage branch deployments but don’t have a full ChatOps stack integrated with their repositories? We wanted to set out to find a way for all developers to be able to take advantage of branch deployments with ease, right from their GitHub repository, and so the branch-deploy Action was born!

How Does GitHub use this Action?
GitHub primarily uses ChatOps with Hubot to facilitate branch deployments where we can. If ChatOps isn’t an option, we use this branch-deploy Action instead. The majority of our use cases include Infrastructure as Code (IaC) repositories where we use Terraform to deploy infrastructure changes. GitHub uses this Action in many internal repositories and so does npm. There are also many other public, open source, and corporate organizations adopting this Action, as well, to help ship their code to production!
Understanding the branch deploy model
Before we dive into the branch-deploy Action, let’s first understand what the branch deploy model is and why it is so useful.
To really understand the branch deploy model, let’s first take a look at a traditional deploy → merge model. It goes like this:
- Create a branch.
- Add commits to your branch.
- Open a pull request.
- Gather feedback plus peer reviews.
- Merge your branch.
- A deployment starts from the
mainbranch.

Now, let’s take a look at the branch deploy model:
- Create a branch.
- Add commits to your branch.
- Open a pull request.
- Gather feedback plus peer reviews.
- Deploy your change.
- Validate.
- Merge your branch to the
main/masterbranch.

The merge deploy model is inherently riskier because the main branch is never truly a stable branch. If a deployment fails, or we need to roll back, we follow the entire process again to roll back our changes. However, in the branch deploy model, the main branch is always in a “good” state and we can deploy it at any time to revert the deployment from a branch deploy. In the branch deploy model, we only merge our changes into main once the branch has been successfully deployed and validated.
Note: this is sometimes referred to as the GitHub flow.
Key concepts
Key concepts of the branch deploy model:
- The
mainbranch is always considered to be a stable and deployable branch. - All changes are deployed to production before they are merged to the
mainbranch. - To roll back a branch deployment, you deploy the
mainbranch.
By now you may be sold on the branch deploy methodology. How do we implement it? Introducing IssueOps with GitHub Actions!
IssueOps
The best way to define IssueOps is to compare it to something similar, ChatOps. You may be familiar with the concept, ChatOps, already; if not, here is a quick definition:
ChatOps is the process of interacting with a chat bot to execute commands directly in a chat platform. For example, with ChatOps you might do something like
.ping example.orgto check the status of a website.
IssueOps adopts the same mindset but through a different medium. Rather than using a chat service (Discord, Slack, etc.) to invoke the commands we use comments on a GitHub Issue or pull request. GitHub Actions is the runtime that executes our desired logic when an IssueOps command is invoked.
GitHub Actions
How does it work? This section will go into detail about how this Action works and hopefully inspire you to leverage it in your own projects. The full source code and further documentation can be found on GitHub.
Let’s walk through the process using the demo configuration of a branch-deploy Action below.
1. Create this file under .github/workflows/branch-deploy.yml in your GitHub repository:
name: "branch deploy demo"

# The workflow will execute on new comments on pull requests - example: ".deploy" as a comment
on:
  issue_comment:
    types: [created]

jobs:
  demo:
    if: ${{ github.event.issue.pull_request }} # only run on pull request comments (no need to run on issue comments)
    runs-on: ubuntu-latest
    steps:
      # Execute IssueOps branch deployment logic, hooray!
      # This will be used to "gate" all future steps below and conditionally trigger steps/deployments
      - uses: github/branch-deploy@vX.X.X # replace X.X.X with the version you want to use
        id: branch-deploy # it is critical you have an id here so you can reference the outputs of this step
        with:
          trigger: ".deploy" # the trigger phrase to look for in the comment on the pull request

      # Run your deployment logic for your project here - examples seen below

      # Checkout your project repository based on the ref provided by the branch-deploy step
      - uses: actions/checkout@3.0.2
        if: ${{ steps.branch-deploy.outputs.continue == 'true' }} # skips if the trigger phrase is not found
        with:
          ref: ${{ steps.branch-deploy.outputs.ref }} # uses the detected branch from the branch-deploy step

      # Do some fake "noop" deployment logic here
      # conditionally run a noop deployment
      - name: fake noop deploy
        if: ${{ steps.branch-deploy.outputs.continue == 'true' && steps.branch-deploy.outputs.noop == 'true' }} # only run if the trigger phrase is found and the branch-deploy step detected a noop deployment
        run: echo "I am doing a fake noop deploy"

      # Do some fake "regular" deployment logic here
      # conditionally run a regular deployment
      - name: fake regular deploy
        if: ${{ steps.branch-deploy.outputs.continue == 'true' && steps.branch-deploy.outputs.noop != 'true' }} # only run if the trigger phrase is found and the branch-deploy step detected a regular deployment
        run: echo "I am doing a fake regular deploy"
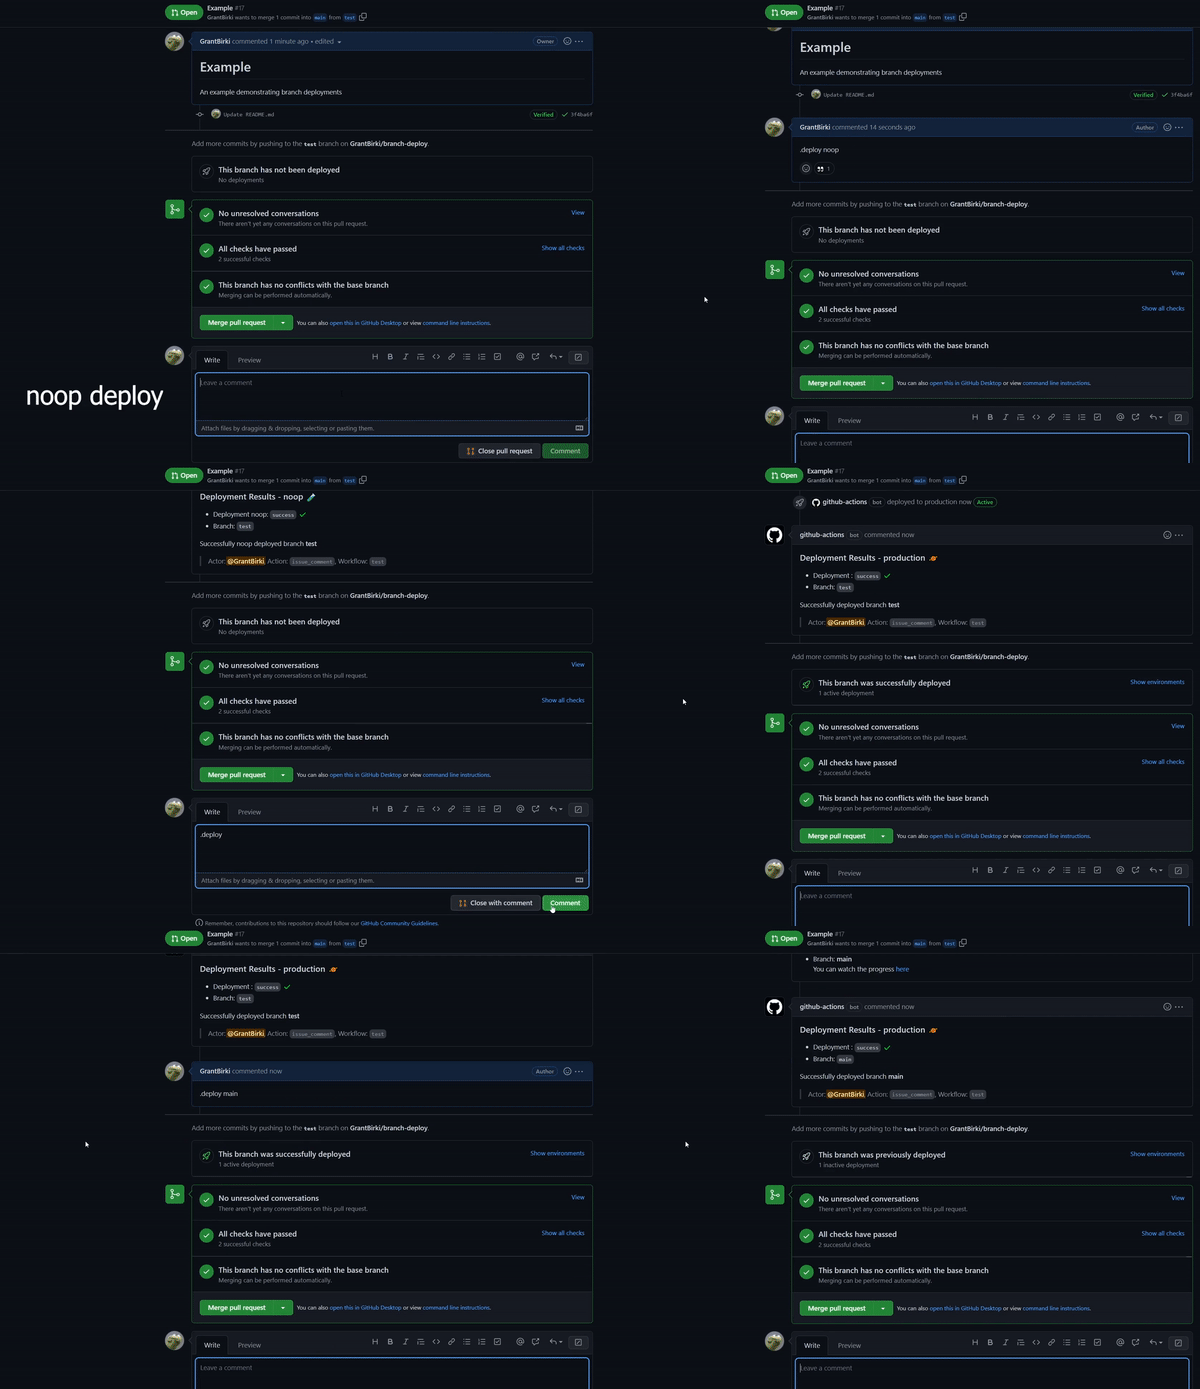
2. Trigger a noop deploy by commenting .deploy noop on a pull request.
A noop deployment is detected so this action outputs the noop variable to true. If you have the correct permissions to execute the IssueOps command, the action outputs the continue variable to true as well. The step named fake noop deploy runs, while the fake regular deploy step is skipped.
3. After your noop deploy completes, you would typically run .deploy to execute the actual deployment, fake regular deploy.
Features
The best part about the branch-deploy Action is that it is highly customizable for any deployment targets and use cases. Here are just a few of the features that this Action comes bundled with:
- 🔍 Detects when IssueOps commands are used on a pull request.
- 📝 Configurable: choose your command syntax, environment, noop trigger, base branch, reaction, and more.
- ✅ Respects your branch protection settings configured for the repository.
- 💬 Comments and reacts to your IssueOps commands.
- 🚀 Triggers GitHub deployments for you with simple configuration.
- 🔓 Deploy locks to prevent multiple deployments from clashing.
- 🌎 Configurable environment targets.
The repository also comes with a usage guide, which can be referenced by you and your team to quickly get familiar with available IssueOps commands and how they work.
Examples
The branch-deploy Action is customizable and suited for a wide range of projects. Here are a few examples of how you can use the branch-deploy Action to deploy to different services:
Conclusion
If you are looking to enhance your DevOps experience, have better reliability in your deployments, or ship changes faster, then branch deployments are for you!
Hopefully, you now have a better understanding of why the branch deploy model is a great option for shipping your code to production.
By using GitHub plus Actions plus IssueOps you can leverage the branch deploy model in any repository!
Source code: GitHub
Tags:
Written by
Related posts

From pixels to characters: The engineering behind GitHub Copilot CLI’s animated ASCII banner
Learn how GitHub built an accessible, multi-terminal-safe ASCII animation for the Copilot CLI using custom tooling, ANSI color roles, and advanced terminal engineering.

When protections outlive their purpose: A lesson on managing defense systems at scale
User feedback led us to clean up outdated mitigations. See why observability and lifecycle management are critical for defense systems.

Post-quantum security for SSH access on GitHub
GitHub is introducing post-quantum secure key exchange methods for SSH access to better protect Git data in transit.