Beginner’s guide to GitHub: Setting up and securing your profile
As part of the GitHub for Beginners guide, learn how to improve the security of your profile and create a profile README. This will let you give your GitHub account a little more personality.

Welcome back to GitHub for Beginners, a series designed to help you navigate GitHub with ease.
So far in this series, we’ve covered the top Git commands every developer should know, creating repositories, uploading files and folders to your repository, adding code to your repository, creating your first pull request, and merging pull requests. Now it’s time to add a bit of security to your profile and a touch of personality.
Let’s get started!
Securing your GitHub account
Passwords by themselves are not completely secure. Passwords can be guessed or hacked by social engineering techniques such as phishing. Your passwords might also be more vulnerable if you reuse the same password for multiple sites and one of those other sites becomes compromised.
One of the best ways to improve the security of your account is to add two-factor authentication (2FA). Two-factor authentication makes it much more difficult for your account to be compromised, even if an attacker has your password. The way 2FA works, you will have to provide a second form of authentication when you log in with your username and password. This second form of authentication can be provided by an authenticator app, a text message, a hardware authentication device, or by using GitHub Mobile. If you’d like to read more about how 2FA works with GitHub, see the 2FA documentation.
Setting up 2FA on GitHub
In this section, we’re going to walk through setting up 2FA for your account on the web using an authenticator. The first step is to download an authenticator app. We recommend downloading the Microsoft Authenticator app.
Once you’ve done that, navigate to the appropriate settings page, and follow these steps:
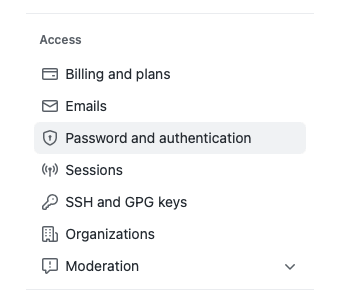
- On GitHub, click your profile picture to open up the main menu.
- Click “Settings.”

-
From the menu on the left, click “Password and authentication.”
-
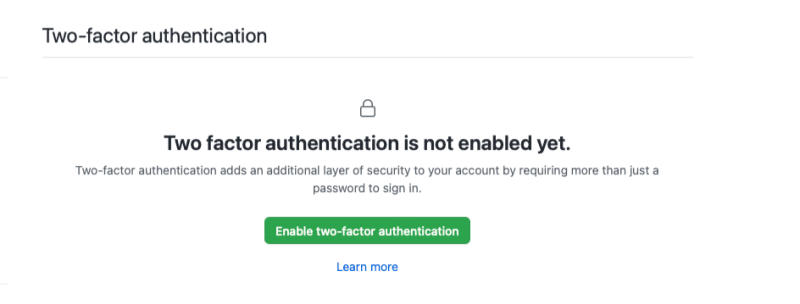
In the main window, click the green button that says “Enable two-factor authentication.” This loads the setup page for enabling 2FA.
Now, use the authenticator you downloaded to scan the QR code. The exact steps for adding the new account will vary depending on the authenticator app you’re using. After you scan the QR code, the app generates a code. Enter the code into the box on GitHub, and then click the green button that says “Continue.”

The screen will update to show you several recovery codes and instruct you to download them. You need to download these codes by clicking the green “Download” button. You should save these codes in a secure location.

One option for a secure location is a password manager. These codes will enable you to get back into your account if you are unable to verify your account using 2FA. Otherwise, you will lose access to your account if you cannot pass the 2FA when you are logging in from a new machine.
After you have downloaded and saved your codes, click the green “I have saved my recovery codes” button.
Congratulations! You successfully enabled 2FA on your account.

Personalizing your profile
Now that your account is more secure, it’s time for you to give it a bit more personality. You can do this by updating your profile README. Your profile README is a special file that acts as an “about me” page on your profile. It’s a great way to introduce yourself so others can get to know you better.
To create your profile README, first create a repository that matches your username.

When you create the repository, you’ll see a message reminding you to set the repository to public and initialize it with a README file to get started. Make sure that the “Public” option is selected, and check the box that says “Add a README file.” Once you’ve verified these items, click the green “Create repository” button at the bottom of the page.
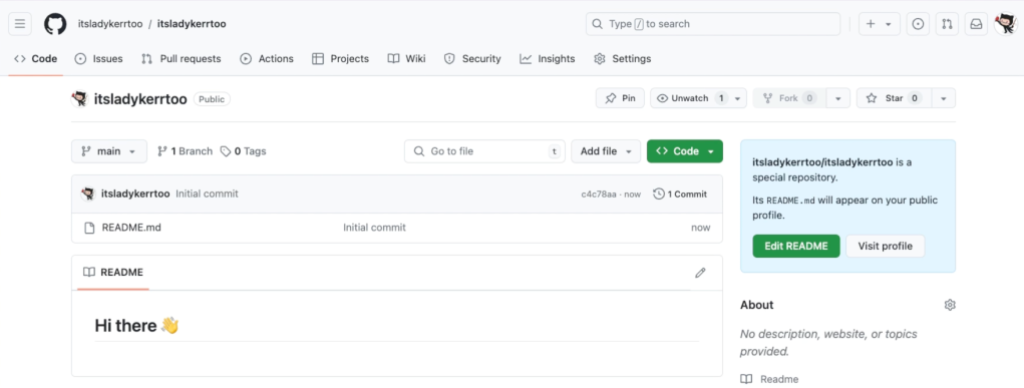
After the profile is created, you should see a box on the right-hand side of the window that indicates this is a special repository. It serves as a reminder that the README.md content will appear on your public profile.
Click the “Edit README” button to begin editing your profile. This will open up the editor and you can edit your profile using Markdown. You can add text, images, animated GIFs, and emoticons as you see fit.
To get you started, here is a profile template. Scroll down to find the Markdown text, and click the copy button in the top-right corner of the template.

Navigate back to your profile’s README and paste in the template. Edit the template to make it yours and match your personal style. After you finish your edits, click the green “Commit changes” button at the top of the editor. Enter a commit message, and optionally a commit description. Then, click the green “Commit changes” button to push these changes to your repository.
Click your username at the top of the screen to navigate back to your main profile page. You should now see a nicely formatted and updated profile!
Your GitHub profile can be a living portfolio of your skills, projects, and interests. For more inspiration on customizing your profile, check out these GitHub Stars’ profiles: yabellini’s, levxyca’s, and omariosouto’s.
Your next steps
Now that you have secured your profile and a personalized README, you’re ready to make a strong impression on anyone who stumbles upon your profile. Let your personality shine and welcome to the community!
If you have any questions, pop them in the GitHub Community thread and we’ll be sure to respond.
Here are some more resources to help you on your GitHub journey:
*5 tips for making your GitHub profile page accessible
* About 2FA
* Configure 2FA
* About your profile
* Personalizing your profile
Tags:
Written by

Related posts
Transitioning as a Hubber
How GitHub’s culture and benefits helped me be the best version of myself.

I automated my job (and it made me a better leader)
Explore how my day as a senior leader looks now that I use 40 automations to help, and learn more about some of my favorites.

GitHub for Beginners: Answers to some common questions
Find the answers to some of the most common GitHub-related questions.