Looking to try GitHub Copilot CLI? Read the Docs and get started today.
GitHub Copilot CLI for Beginners: Getting started with GitHub Copilot CLI
GitHub for Beginners: Getting started with the GitHub Copilot CLI, a step-by-step tutorial.
|
4 minutes
Welcome to GitHub Copilot CLI for Beginners! In this series (available in video format and on the GitHub Blog), we’ll explore how to use your AI coding assistant directly in your terminal, along with tips and tricks on how to navigate the command line like a pro!
In this blog, we’ll walk through what GitHub Copilot CLI is, how it works, and how to get started. You’ll learn how to install it using npm, authenticate with your GitHub account, grant folder permissions, and run your first prompts to generate code directly from the terminal.
Let’s get started!
What is GitHub Copilot CLI?
The GitHub Copilot CLI brings Copilot’s agentic AI capabilities right into the command-line interface (CLI), becoming like any terminal or console based tool you use (with the full context of your repos)!
What makes agents so special is their ability to perform tasks like building code and running tests autonomously, so you can build iteratively. They can even self-correct and fix errors without needing a human to prompt them.
This means you can assign tasks to Copilot, focus on other to-do list items, and then review the results and request additional changes from the terminal—all without having to interrupt your workflow or switch tools. (You can even delegate tasks to Copilot Cloud agent from inside the CLI, more on this later.)
Installing Copilot CLI
Not surprisingly, the first step to using Copilot CLI is installation. The core cross-platform way—if you already have node—to do this is via npm, using:
npm install -g @github/copilot If you’re using a package manager like WinGet or Homebrew, you can install Copilot CLI through those tools as well. (You’ll want to consult those tools’ documentation for the exact specifics on how to do this.)
Getting started with GitHub Copilot CLI
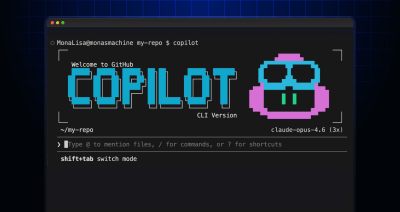
Once you install the product, you can launch it by typing “Copilot” in your command line. There are numerous switches you can use, which we’ll cover later in the series.
If it’s your first time in the terminal, you’ll need to log in with your GitHub credentials.
/loginThis will:
- Tie the client to your Copilot account.
- Connect the readonly GitHub MCP server, which grants access to resources on GitHub. (Don’t worry, we’ll cover MCP later in the series as well!)
When using Copilot, you need to grant access to the folder for Copilot to be able to explore and potentially modify files. You can do this for only this session or save this setting to apply to later sessions, too. This will allow you to launch Copilot again in the future, without having to keep approving it for the same project.
Once you’ve done that, you can start talking to Copilot, asking it questions, and request code or other tasks.
Use cases: What you can do with Copilot CLI
Here are just a few GitHub Copilot CLI use cases. (There are many more covered in the GitHub Copilot CLI 101 blog!)
Ask for an overview of the project: Copilot will explore, open important files, and report back with its findings.
Give me an overview of this project Ask for code, such as a new endpoint: Copilot will look at the project, find existing documentation and examples, and try to follow the practices it sees. Again, it will ask for permission to create the file.
Let’s add a new endpoint to return all categoriesDelegate tasks to Copilot cloud agent: For well-defined tasks, you can delegate to Copilot cloud agent right from the CLI. Copilot will preserve the context from your current session, create a new branch, open a draft pull request, and make the requested changes in the background before requesting your review.
/delegate Let’s deal with issue #14 to add the rest of the CRUD endpoints to gamesOf course, one of the best ways to explore what you can do with Copilot CLI is to simply ask Copilot. It can look through its own documentation and provide guidance on the best ways to interact with it and explore.
Tune in for the next lesson in the series which covers using two different modes: interactive mode to have GitHub Copilot run your project locally or non-interactive mode with the -p flag for quick summaries without leaving your shell context.
Take this with you
Bringing agentic AI right to your terminal opens a whole new way to learn, experiment, and get things done without ever breaking your flow. Keep an eye out for more videos in the GitHub Copilot CLI for Beginners series, where we’ll learn about:
- Interactive vs non-interactive modes
- Copilot CLI slash commands
- Using MCP servers with Copilot CLI
- And more!
Happy coding!
More resources to explore:
- GitHub Copilot CLI for Beginners video series
- GitHub Copilot CLI 101: How to use GitHub Copilot from the command line
- Best practices for GitHub Copilot CLI
Tags:
Written by

Related posts

GitHub Copilot CLI combines model families for a second opinion
Discover how Rubber Duck provides a different perspective to GitHub Copilot CLI.
Run multiple agents at once with /fleet in Copilot CLI
/fleet lets Copilot CLI dispatch multiple agents in parallel. Learn how to write prompts that split work across files, declare dependencies, and avoid common pitfalls.
Agent-driven development in Copilot Applied Science
I used coding agents to build agents that automated part of my job. Here’s what I learned about working better with coding agents.