Top 12 Git commands every developer must know
The latest installment of GitHub for Beginners, where we cover the essential Git commands to get you Git-literate.

Welcome to GitHub for Beginners, our series to help newcomers like you learn the basics of everything from repositories to pull requests and more. (Don’t know what those are yet? That’s okay, it’s why we’re here!)
In our previous post, we covered the fundamentals of Git, and today we’re taking it a step further by talking about the most important Git commands that every developer should know.
Keep reading for the top 12 Git commands you’ll use every day.
- Git config
After you install Git on your machine, the first thing you should do is configure Git so that it understands who you are. The
git configcommand allows you to set Git configuration values that can help you create a customized Git workflow. To set your email and username, typegit config --global user.name "username"andgit config --global user.email "youremail@email.com"and these two settings allow Git to associate your work with your username and email, so you can get credit for the work that you do.
-
Git init
Like we mentioned before, the
git initcommand is used to initialize a new Git repository. Think of it as turning on a Git switch.Let’s say, for example, you create a new folder with the terminal command
mkdir project1. You can go intoproject1by runningcd project1. In its current state,project1is not a Git repository.If you want this folder to be a Git repository so that you can track all changes you make, type
git iwith the alias “I” created earlier for thegit initcommand. Alternatively, you can just typegit initif you don’t have an alias set.
When you run the
git initcommand in an ordinary folder, it allows you to transform that folder into a trackable git repository where you can use Git commands. -
Git status
If you want to see what you’ve done so far in your new Git repository, you can type
git status, which allows you to see what files have been added, deleted, or modified in your working directory. In this case, since you haven’t added any files yet, this should return “nothing to commit.”Let’s create a new file by running
touch hello.mdthen rungit statusagain. Now you should see that you have an untracked file “hello.md”.
An untracked file is one that has not been added to the staging area. To add files to the staging area, you can use the
git addcommand. -
Git add
There are quite a few ways to use this command. For example, you can use
git add .to add all files to the staging area from the working directory or usegit add filenameto add a specific file to the staging area.Let’s create a new file called
learning.pyand another file calledwaiting.py. Now, let’s rungit statusso you can see your changes, then rungit add learning.pyto add this file to the staging area. If you run Git status again, this will show you thatlearning.pyis in the staging area andwaiting.pyis untracked in the working directory.
When files are added to the staging area, that means they are in safe keeping before you commit them. Think of using the Git add command as telling Git, “Please keep track of this file in its current state.”
If you make additional changes to the tracked files, you’ll need to use the
git addcommand again for Git to keep track of them. Add some code to thelearning.pyfile so you can see what we mean.Currently,
learning.pyandhello.mdfiles are being tracked in the staging area butwaiting.pyis currently untracked. If you add thecode print ("I'm learning git")tolearning.py, then rungit statusin the terminal, you’ll see that thelearning.pyfile has been modified and has untracked changes. To keep track of these newer changes, rungit add learning.py.
In the real world, you would typically complete the work you’re doing in the
learning.pyfile and then add those changes to the staging area. Once you’re satisfied with your work, you can then commit your changes. -
Git commit
To “commit” a change is to store a version of your project in the Git history.
Currently,
learning.py, andhello.mdare tracked, whilewaiting.pyis untracked. Let’s rungit commit -m "initial commit"to see what happens.If you run
git status, you’ll see that you have “2 files changed, 1 insertion in git” because you just added two new files, and one of the files has one line of code. You will also see that you have an untracked file—waiting.py—because that file was never added to the staging area.If you add new changes to the
learning.pyfile, you can add both files to the staging area, and along with any other changes you make, by runninggit add. git commit -m "add waiting file and new function"command.
That’s how you use the
git addandgit commitcommands together! Well done tracking changes and storing your new work. -
Git clone
What if you were given a link to a folder from a remote location that you needed to get on your laptop? How would you do that? You’d need to make a copy of the remote repository to your local machine. In the world of Git, this is referred to as “cloning.” The command for cloning is, you guessed it,
git clone.When you work on a team that uses Git for collaboration, you may be asked to use Git to make a copy of a project folder to make changes.
Say, for example, you have a remote repository on GitHub. To make a copy or clone this repository to your machine, click on the green “Code” button, then select the option that says HTTPS. Click on the copy icon to copy the link to the repository, and then open up your terminal and type
git clone <url link>, paste the URL link in your terminal, and hit the enter/return key.
Once you see “done,” you just successfully cloned a repository to your machine. Now, you have your own local copy of that remote repository that you can work in and edit.
-
Git checkout
When working with a Git repository with your team, it’s important to add your changes to a new branch—a branch in a Git repository is like creating a copy of a document so you don’t mess up the original. Branches allow you to work more collaboratively and effectively with your teammates in the same project.
So, let’s create a new branch in the repository that you just cloned.

Type
git checkout -b update-nameto create a new branch calledupdate-namethat you can make your changes on. This command will allow you to create a new branch and switch to the branch at the same time. -
Git branch
To see a list of the branches you have, you can type
git branchand it will show that you have three branches—themainbranch, a branch named init, and the newly createdupdate-namebranch. Hit the q key on your keyboard to exit. -
Git switch
Now, what if you wanted to go back to the main branch? You can use the
git switchcommand. In your terminal, typegit switch mainto return to the main branch. Great, now you’re back on the main branch.Let’s return to the branch you created and add a few changes to a file.
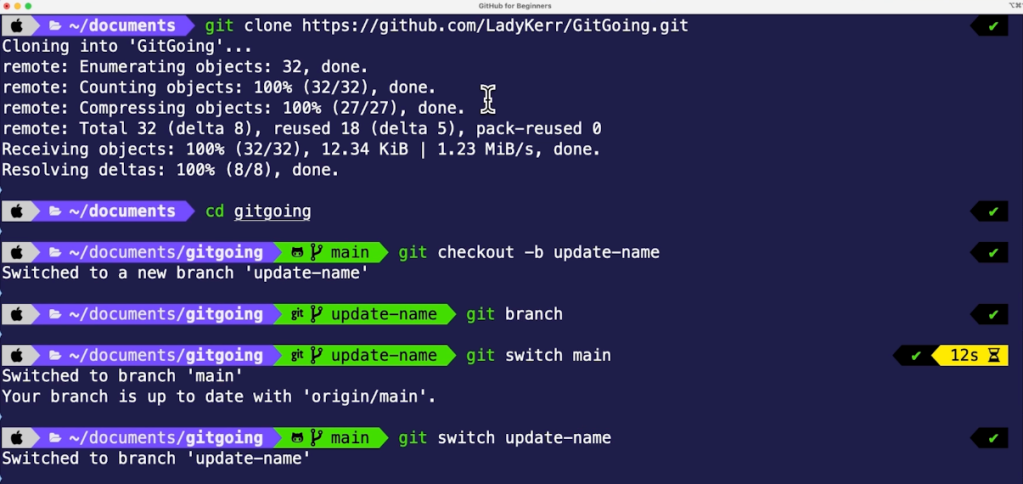
Type
git switch update-nameand then open the project in your code editor. Navigate to theindex.htmlfile, right click on the file, and selectopen preview. This will open up a side browser where you can see the changes live in your code.Let’s say you were tasked with changing the title of this app to “Git Going.” Let’s update the name in the HTML file and run
git statusto see that the file has been modified.Practicing what you learned earlier, add these changes to the staging area, then commit the changes to your local repository—
git add . git commit -m "update app name" git status. Now, get your local changes into the remote repository that you cloned earlier to update the app. -
Git push
To get the changes you just made into the remote repository, you need to push your changes to the remote repository.
The command
git pushtells Git, “Thanks for tracking these file changes. Now I want to upload these changes into the main project file.”When you push your changes, you are essentially updating the remote repository with commits that have been made in your local repository. To do this, use the command
git push <remote> <branch>where “remote” refers to the remote repository, and “branch” refers to the branch you’re working on.In your case, you can type
git push origin update-namewhere “origin” refers to the “remote repository” and “update-name” refers to the branch you want to upload.If you go back to the repository on GitHub, you will see that there’s a new branch available. It’s been “pushed” up to the repository, which is why we call it Git push!

You can now open up a pull request on GitHub to merge your changes into the main branch. A pull request is a proposal to merge a set of changes from one branch into another. In your case, you want to merge the updated name into the main branch.
-
Git pull
git pullis an important command to run to keep your local repository up to date with the remote repository.Now that you’ve updated the main branch in the remote repository with your changes, go back to your local repository.
In the terminal, type
git switch main, then open up the file in your editor. Navigate to theindex.htmlfile and check the name of the app. You’ll see that the app name is still “Todo” in the file even though you just updated the main branch with the new name. So, what happened? If you guessed that you updated the remote repository’s main branch and not your local copy, then you’re right.Remember that a local repository is a copy/clone of your remote repository and each branch has its own history. Since you made the change on the local branch
update-nameand pushed to the remote repository, you need to do the same thing locally and merge your changes into your local copy of themainbranch.You can update your local branches with their remote counterparts with the command
git pull. This command will fetch all changes that were made and merge them into your local branch.
In the terminal, on the main branch, run
git pull. This will update your branch and return the changes that were made. You’ll then see that one file was changed with one insertion and one deletion.
12. Git show
So, you made a bunch of changes. How do you keep track of everything you’ve done so far?
That’s where the command git show comes in. Git show allows you to see the changes that you’ve made on the branch that you’re on. It’s a great way to view the history of the project.
In the terminal, run git show on the main branch. Here, you have a lot of information:
- The commit ID (called sha)
- The author, time, and date of the commit message
- The commit message itself
- The actual content change that was made to the file

The GitHub flow
You’re now fully equipped to work with git as a professional. Practicing these commands will make you a more effective Git user. And this leads us into what we call the GitHub flow.
The GitHub flow is a branch-based workflow for everyone. This means that anytime you work in a repository, you’re going through the GitHub flow,so congratulations, you just did it!
You cloned the repository, created a new branch, made changes on that branch, pushed to GitHub, and opened up a pull request. Typically at this stage, you would request feedback from your teammates about the work that you did and then address comments. Then you’d merge the pull request into the main branch and delete your branch.
Let’s do the final stage of the GitHub flow and delete your branch. The command to delete a branch is git branch -d update-name and this will delete the branch locally. To delete a branch remotely, you can run the next command git push —delete origin update-name and this will delete the branch in the remote repository.

And that’s the GitHub flow.
Wrap-up
You just learned 10 essential Git commands that you’ll be using every day on your journey as a developer. Keep practicing your Git skills by going through the GitHub flow and practicing the commands you just learned. If you have any questions or feedback, pop it in the GitHub Community thread and we’ll be sure to respond!
You can keep practicing your Git skills with the following resources:
Tags:
Written by

Related posts

GitHub for Beginners: Answers to some common questions
Find the answers to some of the most common GitHub-related questions.

GitHub for Beginners: Getting started with Git and GitHub in VS Code
Discover how to use VS Code to interact with GitHub and maintain your projects.
Dungeons & Desktops: 10 roguelikes that never die (because their communities won’t let them)
Roguelikes don’t die. They fork, mutate, get argued over, rewritten, abandoned, and revived again. Sometimes all at once.