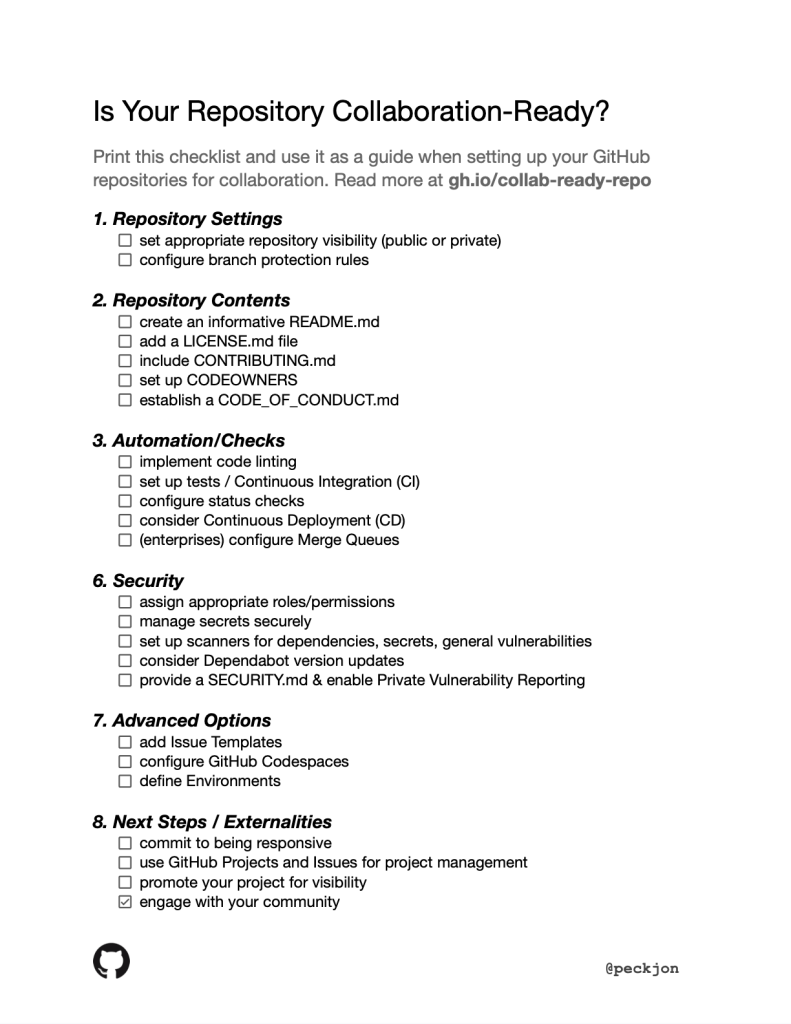
| Want the TL;DR, or you’ve already been using GitHub for awhile? Skip to the end for a printable checklist that you can use to ensure that you’ve covered all aspects of making your repository collaboration-ready.
|
My daughter has a pair of pet gerbils. They’re awesome, but not the most complex creatures to care for. They need their cage cleaned occasionally, their food and water refilled, and may need a neighbor to check in on them if we’re away for a while. But someday, she may have a pet that requires more care and attention–a cat or dog perhaps, which needs to be played with and nurtured every day–so she’ll want to have a few good friends who know her pet and can be their companion whenever she’s away. And someday, she may even have a child of her own, making her connections to community and family ever more important. As the saying goes, it takes a village to raise a child.
So it goes with code projects. My colleagues and I often refer to our projects as “pets” or even “children” (sometimes jokingly, sometimes obsessively). We pour a lot of our own care and attention into them, but it can be easy to forget how important the community’s contributions can be to their success. In the world of software development, collaboration can make the difference between a brittle last-minute release and a reliable, maintainable, pain-free project. Whether you’ve been coding for a day or a decade, your colleagues are there to help strengthen your work. But they can only help if you’ve given them the tools to do so.

Your primary responsibility as the creator or maintainer of a repository is to ensure that others can appropriately use, understand, and even contribute to the project. GitHub is here to support that mission, but ensuring that a repository is collaboration-ready takes a bit more effort than using git clone. So read on to learn the settings, content, and behaviors that will help you succeed.
The settings of your repository lay the foundation for collaboration. They determine who can see and contribute to your project, how contributions are reviewed, and what happens to those contributions once they are submitted. Properly used, they can foster an environment in which contributors across the globe will find, make use of, and help build your project. In a corporate setting, they help shift developers from a siloed way of thinking and building to a “search-first, collaborate-first” mindset. This practice, known as innersourcing, reduces redundant work and accelerates the whole company.

You’re aiming to maximize contributions and reuse, but that doesn’t always mean making your repository public, especially in a corporate setting where information privacy is a consideration. You have several options available in the “Settings” tab of your repository.
- Public lets anyone in the world see and copy your code, and generally allows them to create issues or pull requests, so they can provide feedback about whether it works well, or even suggest (but not force) changes to improve it. This is generally great for personal projects containing no protected information (those tokens are all stored separately, right?) but only for certain “blessed” company projects.
- Internal is a special visibility level used by GitHub Enterprise, allowing anyone inside your organization to see the repository, but nobody in the outside world. We generally suggest this as the default level for company projects that don’t have siloed sensitive information (such as customer-specific data or logic that only a specific group should know about).
- Private is the most restrictive option, and can be a collaboration-killer. Use this option sparingly, and if you do, be sure to invite some collaborators.
- Collaborators are specific individuals or teams you invite to be part of your project. They can be given specific roles such as “Read” (allowing them to see your otherwise private repository), “Write” (letting them directly commit or manage pull requests), “Admin”, and many others.
While you want to maximize the number of people who can see and contribute to your project, you still need to ensure that their contributions are properly reviewed, both by your core team members and by automation. In most cases, you’ll want to create a repository rule (the modern replacement for branch protection) on your main branch and configure it to require a pull request before merging is allowed. By requiring at least one approver, ideally one from your CODEOWNERS file (discussed in the next section), you’ll guarantee that another human reviews each set of changes. In addition, you will want to have automated tools such as unit tests run against each pull request; these are known as status checks and will be covered under “Automation and checks” below.

Software projects don’t just consist of code. Your repository should act as a guide to collaborators, letting them know why it exists, how to use it appropriately, and the best ways to contribute. Adding a few key files (generally written using Markdown) will help other people discover your project and understand how to collaborate effectively.
README.md: This is the first file visitors to your repository will see, so it is critical to include in your repository. It should describe what your project does, how to use the repository, and any configuration needed. Additionally, a good README includes the mission of the project, what it aims to do, and why it exists. Lastly, be sure to describe how and by whom the project is maintained.
LICENSE.md: A license file defines what others can and can’t do with your code and other content. Whether your goal is to allow unrestricted use of your project, or to add special restrictions on its usage and distribution, it’s crucial to include a license. Visit choosealicense.com for guidance on which license might work best for your project, then add one to your repository.
CONTRIBUTING.md: You can reduce the amount of confusion and friction that potential contributors (and you) face by clearly defining why and how others can contribute new code, documentation, art, or other elements to your project. If the contribution steps are very simple, you might just include them in your README; but, if you find it takes more than a paragraph or two (and it usually does), it’s best to create this separate file. It should include information about the types of contributions you’re looking for, how to propose a new feature or bug fix, the process for submitting pull requests, and any specific coding standards or style guidelines contributors should follow. For a good example, take a look at the contributor guide from GitHub’s docs project.
CODEOWNERS: A CODEOWNERS file assigns one or more users who will be responsible for code in a particular part of your repository. As specified in the repository settings, these individuals will be automatically requested for review when someone opens a pull request that modifies code they own. Note that this file, unlike the others mentioned here, should not have the “.md” extension.
CODE_OF_CONDUCT.md: A code of conduct establishes the social norms, rules, and responsibilities that participants in your project should follow. It promotes a friendly and respectful environment for collaboration, and it is easy to add manually or by using one of GitHub’s templates!
With these files in place, your repository will be much more approachable and understandable, and you should start seeing contributions flow more freely. But if you want to go even further, there’s even more you can do to set up your project for healthy contributions.

It’s time to enter the Matrix. As Agent Smith is fond of saying, “Never send a human to do a machine’s job.” While you generally want at least one human reviewer for each major change, you should make their job as easy as possible. GitHub’s built-in automation and CI/CD system, GitHub Actions, allows you to run workflows in response to file changes, pull requests, external triggers such as chat tools, and even cron jobs. Let’s look at a few ways this can make collaborators’ lives easier.
Linters are tools that analyze code to detect various types of errors and enforce a consistent coding style. Incorporating linters into your development process can greatly improve the readability and quality of your code, making it easier for others to understand and contribute to your project. One of the most popular is Super-Linter, which can be initially configured in a single cut-and-paste step.
While the exact compilers and test suites you run will be specific to the language and framework of your application, most can be executed automatically in your repository. To find the right ones, search through GitHub Marketplace’s list of Build and Test Apps & Actions, then follow the instructions specific to your preferred tool. Or, execute them by running command-line scripts and arguments in your GitHub Actions workflow.
When information is surfaced to reviewers right inside the pull request, it makes their job faster and easier, eliminating the need for them to manually run test suites or run through a physical checklist. If the automated checks fail, you can even block deployments from going out the door. Once you’ve added a linter or test suite as described above, and it has run at least once, consider configuring it as a status check in your repository settings. This will help ensure that your app is properly tested each and every time a pull request is created.
This is not a complete list, but every project is different, so also consider what other code quality, dependency management, or pre-release automation you might want to include. Then, consider how you want to deploy the project. In most cases, you’ll find there is a component in the GitHub Marketplace that provides turnkey integration with your favorite infrastructure provider, but it’s also possible to write your own GitHub Action to deploy your app after all the checks have passed. And, for high-volume enterprise projects, consider using merge queues if you start getting traffic jams on rapidly changing branches.
With these automation tools and checks in place, you can have more confidence in the quality and consistency of contributions to your repository and spend less time manually managing the process.

Security is a paramount concern in any software project and is especially important when including a variety of collaborators who may have different levels of security training (or none at all). Fortunately, there are a few simple steps you can take to protect your code, data, and users from potential threats.
Carefully decide which roles, and thus permissions, you give to collaborators in your repository. Generally speaking, you’ll want to assign the “Read” role to the general public. “Triage” and “Write” are for trusted individuals such as members of your company or working group (but only once protected branches and checks have been set up). “Maintain” and “Admin” roles are best for your core maintainers, who are responsible for reviewing and managing what goes into production. Also consider that “Triage” and above have the ability to manage issues, discussions, and comments–so you’ll want to trust that they have the commitment and background to manage the flow of metadata surrounding your project. Enterprise customers can take advantage of custom repository roles for more granular permissions control.
Secrets are sensitive data like API keys, passwords, and certificates that you need to keep private. You don’t want these to be directly embedded into your code or your logs; instead, you should use either a third-party keystore or GitHub’s native secret-management tools, which can be found under the “Secrets and Variables” section of your repository settings. There, you’ll find separate sections for GitHub Codespaces (a tool described in the “Advanced Options” section below) and for GitHub Actions, because you may want to use different secrets during development than you do in production.
Scanning code for vulnerabilities is a complex topic, but breaks down into three major categories.
- Dependencies: 80-90% of most applications’ code comes from third-party sources–the frameworks and packages we build the rest of our code on top of. GitHub Dependabot is available on all public repositories, and can be automatically enabled across entire organizations. It is able to alert you (and help provide a fix) whenever an insecure dependency is found. To ensure that Dependabot is running, check the “security” tab at the top of your repository. You can also enable dependency version updates to let you know when new versions of packages are available, so you can keep up-to-date even if an explicit vulnerability has not been identified.
- Secrets: While you should already be using a secret manager as described above, we all make mistakes, and some tokens may slip through the cracks and get embedded directly into code. Secret scanning tools, provided both through third-party integrations and via GitHub Advanced Security for Enterprises, can notify you about or even block secret tokens as they are pushed into your repository.
- Novel Vulnerabilities: As you write new code, you may accidentally add new vulnerabilities, either in the novel code itself or in the way you wire together existing components. There are a wide variety of ways to scan your overall application, some of which are language-dependant. Enterprises can also rely on GitHub Advanced Security’s code scanning to find a wide variety of flaws, from SQL injection to circular references, in most popular coding languages.
If a user or security researcher identifies a problem with your project, they need to know how to securely and responsibly report it. Include a security policy file in your repository to provide these guidelines and to help maintain the trust of your users and the wider community. Also turn on private vulnerability reporting; this allows security researchers to securely report any vulnerabilities they find!

Beyond the basics, there are a number of advanced options you can leverage to further enhance your repository’s collaboration readiness.
As collaborators make use of your project, they will file issues asking for bug fixes and enhancements. By default, these requests will be fairly unstructured, and you may need to loop back to the creator several times to get all the information you need. By creating a few issue templates, you can provide guidance, define which required and optional fields users will see, and set up specific options they’ll select when opening issues.
GitHub Codespaces provides a complete, configurable dev environment on top of a repository. This allows anyone to work on your project from anywhere, without having to set up a local environment. Providing a well-configured codespace can make it much easier for others to contribute to your project and makes the project less brittle, since all developers will be working from the same configuration (eliminating the “it works on my machine but not yours” problem).
GitHub Environments let you specify where certain tasks (like deployments) should happen. They can be configured with specific protection rules, ensuring that important tasks only happen in a controlled and secure manner.
Now that you’ve set up your repository, it’s time to consider the broader aspects of collaboration, including your role as a maintainer and how you engage with your community.
As a maintainer, your responsiveness plays a crucial role in fostering a healthy, collaborative environment. This involves promptly addressing issues and pull requests, providing feedback, and guiding new contributors. Set aside specific times each week that you’ll dedicate toward responding to changes and remediating problems. If you want to measure how responsive your project is, check out the Metrics Action.
GitHub’s native project planning capabilities are usable both for individual projects and enterprise-wide collaboration. Set up GitHub Projects to manage your work and provide visibility to your community. This not only helps you stay organized, but also allows others to understand the current status of the project and where they can contribute.
A well-maintained repository is of little use if nobody knows about it. Promote your project through blog posts, demos, or even dedicated project portals. The more people who know about your project, the more potential contributors and users you can attract.
Engaging with your community is key to fostering a healthy, collaborative environment. This might involve organizing meetups, running a project blog, or even just actively participating in discussions.
By following these standards, you can ensure that your repository is not just collaboration-ready, but also a place where a vibrant community can flourish! Print out this checklist, and use it to help guide you along each time you create (or revisit) a GitHub repository.
Download this printable checklist that you can use to ensure that you’ve covered all aspects of making your repository collaboration-ready. Or, use this handy Issue Template to create an updatable checklist right inside your own GitHub repository!
Want to learn how GitHub can help your organization do more with AI?
At GitHub Galaxy 2024, we’ll explore cutting-edge research and best practices in the rapidly evolving world of AI—empowering your business to maximize productivity and innovate at scale.
Register now >
Images of gerbils in this post were AI-generated using Bing Image Creator