Introduction to SELinux
SELinux is the most popular Linux Security Module used to isolate and protect system components from one another. Learn about different access control systems and Linux security as I introduce the foundations of a popular type system.

At GitHub Security Lab, our main mission is helping secure the open source software we all rely on. While securing applications themselves is important, one of the best ways developers and system administrators can ensure the security of their systems is to create multiple layers of privilege. Linux, the most popular open source operating system, provides many security systems to do this, including allowing an administrator to give each service and user the permissions it needs and preventing them from accessing resources they don’t.
Today, I will be introducing SELinux, one of many security mechanisms that is implemented into Linux. Despite many Linux distributions having Linux Security Modules enabled by default, general knowledge of SELinux among developers and system administrators is not as common as one would expect. In addition, theoretical and practical knowledge about SELinux is often dispersed across the internet, often written in blogs or forums from years in the past. In this blog, I hope to introduce SELinux to developers and administrators who are looking for a practical way to improve the security of their systems that don’t have a security module enabled, and show those already running a module what SELinux has to offer. I will introduce the differences between MAC and DAC, explain the basics of the SELinux type system, suggest some useful tools and examples when interacting with SELinux, and give a succinct explanation of how SELinux works in the kernel.
One question that immediately comes to mind in such a multi-user system is ownership. A user may own, for example, a file. After assigning an owner, the next question to naturally come up is: can a user interact with resources owned by another user? This has led to the development of Access Control, which is a standard used to define permissions on systems. Access Control can be divided into two main types: Discretionary access control (DAC) and Mandatory access control (MAC). Discretionary access control is based around owners, where an owner can decide who has access to its resources. DACs are used in all modern day operating systems. For example, POSIX operating systems assign an owner to each file/directory who can decide how users in its group and outside its group can interact with the file. Another example is Windows, NTFS permissions are slightly more complex allowing for overlapping allow and deny permissions, but still follow an owner-centric model. MACs are much less popular and are based around the resources themselves, how sensitive they are and the level of access users need to access that level of sensitivity. MAC systems have become more popular in the past years as the users are looking for better granularity and control over the security of their system. Currently, some popular MAC systems include seccomp, which is used by containerization software such as docker, and Mandatory Integrity Control, which provides integrity levels to secure objects on Windows. Today, we will look at one of the first MAC’s to be added to the Linux kernel, SELinux.
SELinux was originally a development project from the National Security Agency (NSA) and originally implemented as a loadable kernel module for Linux kernel v2.4. The NSA integrated SELinux into the Linux kernel using the Linux Security Modules (LSM) framework. Many other MAC frameworks, such as apparmor, tomoyo, and smack, utilize the LSM framework as well in order to hook into the Linux kernel. A list of these frameworks can be found under the /security directory in the kernel source tree. While many MAC frameworks exist, by far the two most popular are AppArmor, enabled by default on recent Ubuntu versions, and SELinux, enabled by default on Android 5.0+ and Red Hat/Fedora. In order to better understand SELinux and how a security policy can be enforced, I will first introduce the basic architecture of SELinux.
SELinux architecture—the basics
The SELinux architecture can be split into four main components.
- Firstly, a Subject must request access to take an action. In most cases, the subject is a process that is requesting access to a resource. Access can be controlled via Access Vector Rules, whose details will be presented shortly.
- Second, an Object Manager (OM) that controls the access of the subject. It will query the Security Server in order to allow or deny actions.
- Security Server—the security server makes decisions based on the Security Policy and returns an answer.
- Access Vector Cache (AVC)—this is a cache that stores the decisions of the security server in order to speed up performance.
The SELinux documentation gives a concise diagram showing the interaction between these four components.

There can only be one Security Server, which resides in the kernel. However, the AVCs and OMs can reside both in the kernel and in userspace. In kernel space, the Linux Security Modules framework is the OM, as it decides which kernel services can be restricted by a security framework such as SELinux. AVCs are normally implemented as a hashmap used to cache the decisions in the kernel or userland implementations. In userspace, a single application can be both the OM and the AVC for the resources it controls. This is possible by utilizing the SELinux API in order to query the Security Server.
Basic understanding of context
In UNIX’s DAC system, the permissions are laid out into the following format:
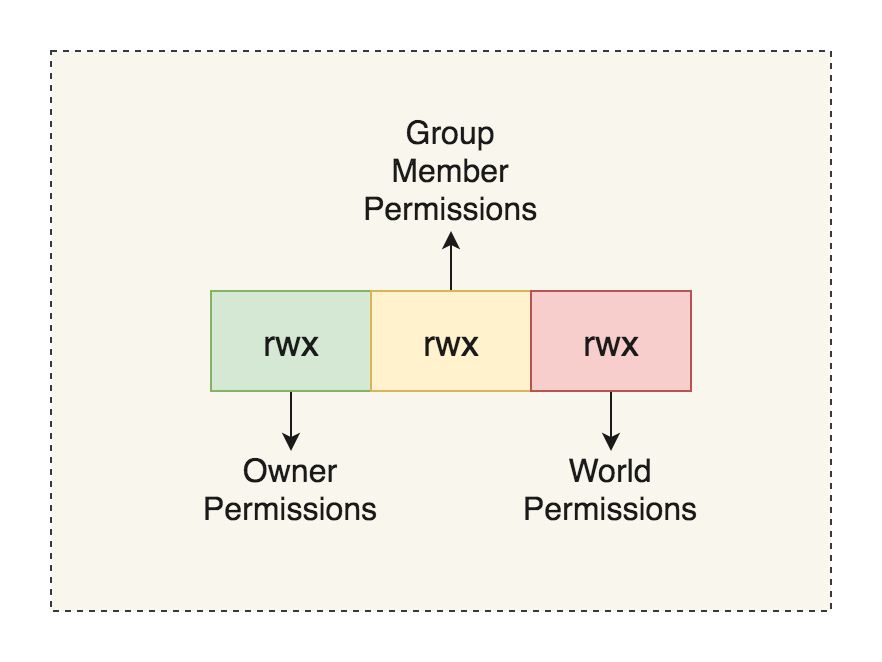
Here, rwx stands for read, write and execute respectively. Each box shows the permissions for the owner, group member, and non-group member, respectively. The owner of a file has the ability to change the permissions of the files that they own. We can use the ls command with the lowercase L flag in order to see the permissions of a Unix file.
policy> ls -l example

-rw-r--r-- 1 kevin staff 0 Apr 30 22:29 example
ls shows the permissions, numbers of hardlinks, owner (kevin), group (staff), size (0), date, and file name
In contrast, SELinux MAC assigns a security context to each subject or object, where subjects can be thought of as processes and objects are resources provided by the operating system or userspace program. We can use the ls command with the Z flag in order to see the SELinux context of a Unix file.
policy> ls -Z /etc/passwd

system_u:object_r:passwd_file_t:s0 /etc/passwd
The security context format looks as follows: user:role:type:[:range]
where
User
The user represents a SELinux user. A SELinux user is separate from a Linux user but can be assigned multiple Linux users and helps bridge the gap between the Linux world and SELinux world. The names for SELinux users will often end in _u.
Role
The role represents the role a user should be in. A role may have more than one SELinux user and they end by convention in _r. Roles often represent the job of a Linux user, such as an administrator, normal user, database administrator, etc.
Type
Types are the most important part of a context as all rules are based on types, and therefore the type of a subject, domain, or object decides its permissions. When a type is associated with a process, it defines what processes (or domains) the SELinux user (the subject) can access. When a type is associated with an object, it defines what access permissions the SELinux user has to that object. SELinux and type enforcement go hand in hand. Users present in privileged SELinux domains generally labeled as unconfined can often specify SELinux policy files, *.te files, in order to create specific permissions for a type/domain. More information about this can be found in the Security Policy section.
Range
The range field of a context is an advanced setting that assigns a range of sensitivities. These are represented in the format s#, where # is the number. By convention, the lower are less privileged than higher ones. Sensitivities can read and write to their own sensitivity level, but can only read from lower ones and only write to higher ones. You can define one sensitivity to dominate another by using the dominance statement in the SELinux policy. For example, dominance {s1, s2} means s2 dominates over s1. When range is only defined by sensitivity, this is called Multi-Level Security (MLS). In addition to MLS, there is Multi-Category Security, where a combination of sensitivity and categories are used in order to calculate access. MCS introduces the idea of categories, which are the compartments within which the sensitivities apply. In contrast to sensitives, there are no hierarchies in categories, but they are used for defining different types of resources. For example, financial documents can belong to work, side business, and personal investments. A process can only access objects that are in the same categories as it itself is in. Overall, a range may look like s1-s15:c0.c700, which means a process has an effective sensitivity of s1 and a clearance (maximum) sensitivity of 15, with the ability to access containers 0 through 700. Therefore, given an object in s0:c0, the above process can only read from it because it is of a lower sensitivity level and found in the same container.
Now that we have an understanding of how SELinux labels work, we can utilize some tools to learn more about SELinux. I will be using the Fedora distribution where SELinux is enabled by default.
Please note that some Linux distributions have different MAC systems enabled, and running multiple exclusive LSMs at the same time will cause issues. For example, Ubuntu has AppArmor enabled by default, therefore enabling SELinux while AppArmor is enabled will prevent you from booting properly. Please check include/linux/lsm_hooks.h for the LSM_FLAG_EXCLUSIVE to see if your LSM is exclusive.
First, we can get a list of users using the -u flag:
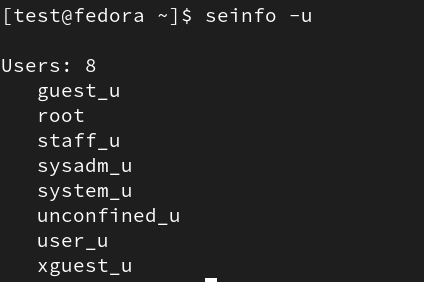
We can run semanage login -l in order to get the mappings of the Linux user to the SELinux user.

Here, we can see the root user is under the unconfined_u SELinux user. Here, the __default__ means any user that is not explicitly defined in the configuration file, so therefore any newly created Linux users are part of the unconfined_u. For this example, I have manually mapped alice and bob Linux users to the user_u SELinux user.
You can also look at the mappings without a tool by reading the /etc/selinux/{SELINUXTYPE}/seusers file, but changes to this file will not apply directly to the SELinux policy and will be overwritten.
In a similar fashion, the current range of sensitivities can be viewed using the /etc/selinux/{SELINUXTYPE}/setrans.conf

Looking at the Fedora config, we see that only the s0 sensitivity is used in Fedora across all subjects/objects and that Fedora supports categories from 0 – 1023.
Security policy
SELinux policy is a group of policy sources that define many of the components we have been introduced to, such as the names, roles, types etc. However, SELinux policies are usually not created from scratch. Instead, you can use a baseline policy, called the reference policy, which provides classes and rules that utilize the core Linux components. The reference policy originated from the NSA, was maintained by Tresys and is now located in the SELinuxProject github organization.
In addition to the reference policy, each individual vendor may edit the policy in order to support their own services and improve security. In order to better understand what a SELinux policy looks like, we will analyze the reference policy to understand the basic structure of a policy and what can be changed. In order to follow along, you can clone the repository located here: https://github.com/SELinuxProject/refpolicy.
When opening a SELinux policy, a number of file types may appear and it is useful to know their names and purpose. The most common file types you will find are the .te and .if files, which make up the core of the SELinux policy. .te files are the type enforcement files, and they make up the main core of the logic behind the policies. In this file, you can write allow rules, declare types or typedefs and call macros defined by .m4 files. While browsing SELinux policies, you will encounter macros such as gen_context, whose name usually fully explains their purpose. These macros are defined in .m4 files that are present in the policy. Next the .if are short for interface files, which are macros but as their name suggests act as interfaces to the domains introduced in the current module. Lastly, you will see file context files, .fc, which specify a list of paths and contexts assigned to that path. In the last section we used ls -Z to view the context of /etc/passwd, but we can also see it defined in authlogin.fc:
/etc/passwd[-\+]? – gen_context(system_u:object_r:passwd_file_t, s0)
Upon opening the repository we can navigate to the policy folder where the policies we are looking for. Here, we can see the flask , modules, and support folders. Looking at the flask folder, whose name represents the first SELinux iteration named Flux Advanced Security Kernel, we see a file called initial_sids. Here, we can see the sids that are generated on boot in order to properly identify a variety of different services. A SID is an int that is used to identify a security context and used internally in the kernel as an identifier. In order to see which SIDs correspond to which contexts, we can check out the modules definitions and find an entry matching the format:
sid name context
For example, the sid kernel has the following entry:
sid kernel gen_context(system_u:system_r:kernel_t,mls_systemhigh)
Here, we can see that objects created by the kernel, such as threads and sockets, will be given the sid kernel, meaning their context. If we look at the database in the security server, we can see the context structure holds some of these initial sids, which includes their name, relevant information, context and sid number. Generally, initial sids are not changed as they require changes to the Linux kernel. In the Security Server’s sidtab, we can see how the kernel may translate the sid to a context. In short, the context for non-initial sids are located in the sidtab, which contains a tree of pointers called roots. The Security Server uses the sid in order to obtain the correct level and leaf node in sidtab->roots, then uses the sid in order to index into the pointer to find the sidtab_entry with the correct context for the given sid. Similarly, the isid member in sidtab contains an array of initial sids. Next, let’s look at the acess_vectors file, where you see structures following the format:
common name {permission}
We can also see entries of the format:
class class_name
inherits common_name{
extra permission 1
…
}
Here, we can see the defined classes represent common objects in the kernel, such as files, directories, sockets etc. If allowed by the config, types can be given permissions to access classes of another type. Let’s take a simple example,
allow init_t user_home_t:file read;
This means that subjects of the type init_t are allowed to read files that have the type user_home_t. This is called an allow rule, which is part of a greater set of rules called access vector rules. The allow rule makes up the majority and core of any SELinux policy, while dontaudit and auditallow rules decide where auditing occurs, and lastly the neverallow rule nullifies any previous and future allows.
Looking into the modules folder, we can see that the policy is separated into different categories, such as admin, apps, kernel, etc. These categories are further divided into a module (which consists of .te (type enforcement), .fc (interface file) and .if (file context) files), with each type enforcement file starting with policy_module macro. Each module is compiled into a .pp file which can be loaded into the operating system.
If you are interested in learning more about the SELinux internals, I would recommend getting familiar with the contents of the modules folder for the particular flavor of policy your software uses. It can help you understand the definitions of many common macros and can be a good reference if you run into any SELinux permission issues while interacting with the Linux system and its native services.
What a deny looks like on SELinux logs
As an administrator or user of a system with SELinux enabled, a common occurrence will be SELinux permission issues, especially when installing new software. Luckily, SELinux has a variety of tools to allow you to diagnose and fix the issue. First, I would like to introduce what an access denial log entry looks like and where to find the logs for access denials.
type=AVC msg=audit(1680661610.629:836): avc: denied { append } for pid=774
comm=72733A6D61696E20513A526567 name="messages" dev="sda3" ino=255765 scontext=system_u:system_r:syslogd_t:s0 tcontext=unconfined_u:object_r:named_conf_t:s0 tclass=file permissive=0
This is an example of a AVC denial, with the relevant subject context, target context, class, permissions and type. SELinux logs can be found under /var/log/audit or /var/log/audit/audit.log or by using some helper binaries such as sealert. Importantly, there is a tool called ausearch that allows you to filter through this log by a variety of the fields I mentioned above. For example, if I just want to see AVC (denials) then we can run ausearch -m AVC in order to list all of them.
After finding our denial, we first need to assess that the subject should be able to access the target it’s been denied access to. We can write some rules manually to bind these two together and solve the issue or we can use tools such as use audit2allow, an application that takes in the denial log and suggests new rules to add in order to fix our issue. In order to add our new rules to the current SELinux policy, we can create a new module and install it to the current system; policies are modular and can be updated on live machines. First, create a .te file that contains all the new rules you would like to apply to the policy. Ensure your type file has the policy_module(name, version) macro in order to properly name your module, and ensure your file names match your module name. Next, grab the Makefile from /usr/share/selinux/devel/Makefile which we will use to compile files, and run
make module_name.pp
which should result in a module_name.pp file in the working directory, which is our module. Lastly, load this module into your computer using semodule -i module_name.pp.
Using the seinfo, we can view our newly created types and rules:
![]()
![]()
LSM Internals
In order to understand how SELinux can control services at the kernel level, we must understand the Linux Security Module Framework, which is the building block for many MAC systems. I will introduce some of the relevant kernel structures of the LSM framework in order to better understand the framework. First, we can see a list of LSM hooks present in the security/security.c file, whose names represent the action and structure they use to intercept. We can take the security_socket_create hook as an example:
int security_socket_create(int family, int type, int protocol, int kern)
{

    return call_int_hook(socket_create, 0, family, type, protocol, kern);

}
Clicking on any one of these functions, we can see how LSM will hook the service. In the case of security_socket_create:
int __sock_create(struct net *net, int family, int type, int protocol,
struct socket **res, int kern)
{
    int err;
    struct socket *sock;
    const struct net_proto_family *pf;

    /*
    * Check protocol is in range
    */
    if (family < 0 || family >= NPROTO)
        return -EAFNOSUPPORT;
    if (type < 0 || type >= SOCK_MAX)
        return -EINVAL;

    /* Compatibility.

    This uglymoron is moved from INET layer to here to avoid
    deadlock in module load.
    */
    if (family == PF_INET && type == SOCK_PACKET) {
        pr_info_once("%s uses obsolete (PF_INET,SOCK_PACKET)\n", current->comm);
    family = PF_PACKET;
    }

    err = security_socket_create(family, type, protocol, kern);
    if (err)
         return err;
…
hooks the internal __sock_create function under the networking subsystem. These security_xxxx functions are implemented into many syscalls, drivers and services in order to query the SELinux security server before taking any privileged actions. The security_xxx functions are wrappers around the actual LSM hooks, which use the call_hook function in order to access the hook. LSM hooks must be initialized by the security module that wants to use it or else they will return a default value. If we look into the SELinux module, we can see each of the LSM_hooks being initialized by SELinux use the LSM_HOOK_INIT macro
static struct security_hook_list selinux_hooks[] __lsm_ro_after_init = {
LSM_HOOK_INIT(binder_set_context_mgr, selinux_binder_set_context_mgr),
LSM_HOOK_INIT(binder_transaction, selinux_binder_transaction),
LSM_HOOK_INIT(binder_transfer_binder, selinux_binder_transfer_binder),
LSM_HOOK_INIT(binder_transfer_file, selinux_binder_transfer_file),
…
which creates a security_hook_list, whose head is placed into
/*
* Initializing a security_hook_list structure takes
* up a lot of space in a source file. This macro takes
* care of the common case and reduces the amount of
* text involved.
*/
#define LSM_HOOK_INIT(HEAD, HOOK) \
{ .head = &security_hook_heads.HEAD, .hook = { .HEAD = HOOK } }

/* `security_hook_heads`, an external variable used by the previous security_xxxx functions. */

struct security_hook_heads {
    #define LSM_HOOK(RET, DEFAULT, NAME, ...) struct hlist_head NAME;
    #include "lsm_hook_defs.h"
    #undef LSM_HOOK
} __randomize_layout;
Looking in the SELinux directory, we see that the selinux_socket_create function is the corresponding function for the socket_create LSM hook, and therefore we can look at selinux_socket_create to see what it will do.
static int selinux_socket_create(int family, int type,
int protocol, int kern)
{
    const struct task_security_struct *tsec = selinux_cred(current_cred());
    u32 newsid;
    u16 secclass;
    int rc;

    if (kern)
         return 0;

    secclass = socket_type_to_security_class(family, type, protocol);
    rc = socket_sockcreate_sid(tsec, secclass, &newsid);
    if (rc)
        return rc;

    return avc_has_perm(&selinux_state,
    tsec->sid, newsid, secclass, SOCKET__CREATE, NULL);
}
Here, we can see the function will get the SELinux sid (newsid) for the corresponding socket type and the sid (tsec->sid) for the current user, then query the AVC (by calling avc_has_perm) to see if this subject (process) can create this new object (socket). While some objects may have a singular type, SELinux may need to interact with a preexisting object whose type changes based on user discretion. Here, LSM has introduced a *_security field into many of the critical kernel objects, in the form of a void pointer to allow modules to use them as they please. While sockets may not be an interesting structure, files are structures whose type can change. Therefore, let’s see how _security functions are used by SELinux. First, I will introduce selinux_inode, which returns the data stored at the inode struct using the i_security field.
static inline struct inode_security_struct *selinux_inode(
const struct inode *inode)
{
    if (unlikely(!inode->i_security))
         return NULL;
    return inode->i_security + selinux_blob_sizes.lbs_inode;
}
If we look at the hooks in SELinux, we can see there is the may_create function, a helper function that checks if a file can be created by a certain user in a certain directory.
/* Check whether a task can create a file. */
static int may_create(struct inode *dir, struct dentry *dentry, u16 tclass)
{
    const struct task_security_struct *tsec = selinux_cred(current_cred());
    struct inode_security_struct *dsec;
    struct superblock_security_struct *sbsec;
    u32 sid, newsid;
    struct common_audit_data ad;
    int rc;

    dsec = inode_security(dir);
    sbsec = selinux_superblock(dir->i_sb);

    sid = tsec->sid;

    ad.type = LSM_AUDIT_DATA_DENTRY;
    ad.u.dentry = dentry;

    rc = avc_has_perm(&selinux_state,
    sid, dsec->sid, SECCLASS_DIR,
    DIR__ADD_NAME | DIR__SEARCH,
    &ad);
    if (rc)
        return rc;

    rc = selinux_determine_inode_label(tsec, dir, &dentry->d_name, tclass,
    &newsid);
    if (rc)
         return rc;

    rc = avc_has_perm(&selinux_state,
    sid, newsid, tclass, FILE__CREATE, &ad);
    if (rc)
        return rc;

    return avc_has_perm(&selinux_state, newsid, sbsec->sid, SECCLASS_FILESYSTEM, FILESYSTEM__ASSOCIATE, &ad);
}
Here, we can see the inode_security function, a wrapper around selinux_inode function, checks the inode corresponding to the directory for its security attributes, where it grabs the sid of the directory to compare against the current task in order to see if file creation is possible in the directory.
SELinux in practice
While understanding how SELinux works is great to know if you are interested in OS internals, let’s take a look at how SELinux is implemented in applications. First, we will take a look at a commonly used Linux password tool, to get familiar with the API and understand how userspace programs can query the kernel. After that, I will suggest an exercise for the reader to better understand userland AVCs and Object Managers.
The basis of userspace SELinux is libselinux, a library that supplies a standard API in order to interact all things SELinux, including (but not limited to) querying the SELinux policy, implementing an AVC cache, setting callbacks when SELinux state changes, and learning more about the SELinux system in general.
passwd is a simple utility that changes a password for a specific account. Usually, a user is only able to change their own password, while root is able to change all passwords.
int check_selinux_permit (const char *perm_name)
{
    char *user_context_raw;
    int r;

    if (0 == is_selinux_enabled ()) {
         return 0;
    }

selinux_set_callback (SELINUX_CB_LOG, (union selinux_callback) { .func_log = selinux_log_cb });

if (getprevcon_raw (&user_context_raw) != 0) {
    fprintf (shadow_logfd,
    _("%s: can not get previous SELinux process context: %s\n"),
    shadow_progname, strerror (errno));
    SYSLOG ((LOG_WARN,
    "can not get previous SELinux process context: %s",
    strerror (errno)));
    return (security_getenforce () != 0);
}

    r = selinux_check_access (user_context_raw, user_context_raw, "passwd", perm_name, NULL);
    freecon (user_context_raw);
    return r;
}
Here, we can see that SELinux is checking if the current process context has the permission passwd in the class passwd, which essentially allows a process to change another user’s password. If we look at (via ls -Z) /usr/bin/passwd, we see that it has the type passwd_t. When a user executes /usr/bin/passwd, a domain transition occurs (if allowed by SELinux policy) that allows the user to launch processes that run in other domains. In this example, only the root user is checked for SELinux permissions. Thus, a simple way to prevent the root user from running passwd to change passwords would prevent this domain transition from occurring, and thus the /usr/bin/passwd would run as another type without the correct permissions.
While passwd is a SELinux-aware application, it is a relatively simple application that does not provide that much SELinux functionality. There are not many applications that create their own AVC cache and Object Manager; two of the more popular ones being Dbus, which restricts the processes that can send messages to its services, and sepgsql, an extension to Postgresql with a newer and much more granular implementation.
Exercise for the reader
In order to see the parallels between the userland and kernel AVC, I would recommend looking at the sepgsql folder under the postgres repository in order to analyze a project with a userland AVC and granular control of resources. I would recommend taking a look at the postgres documentation if you are looking for a high level overview of the databases, users and other resources contained by SELinux. I have appended two documents that I think provide a great resource to better understanding the sepqsql code.
- https://github.com/SELinuxProject/selinux-notebook/blob/main/src/postgresql.md
- https://wiki.postgresql.org/wiki/SEPostgreSQL_Introduction
Conclusion
In this blog, I introduced each of the core components of SELinux to help new users understand the big picture. SELinux can secure and isolate components in your system, and my goal is to help you decide if using SELinux is right for you. I hope that in reviewing you now have a solid understanding of SELinux policies and its implementation in both userland and kernel space, and are able to find and understand simple SELinux logs. The examples and resources provided in this blog post should help you get started in exploring more about SELinux in your own system.
Tags:
Written by

Related posts
Transitioning as a Hubber
How GitHub’s culture and benefits helped me be the best version of myself.

I automated my job (and it made me a better leader)
Explore how my day as a senior leader looks now that I use 40 automations to help, and learn more about some of my favorites.

GitHub for Beginners: Answers to some common questions
Find the answers to some of the most common GitHub-related questions.