Highlights from Git 2.36
Another new release of Git is here! Take a look at some of our highlights on what’s new in Git 2.36.

The open source Git project just released Git 2.36, with features and bug fixes from over 96 contributors, 26 of them new. We last caught up with you on the latest in Git back when 2.35 was released.
To celebrate this most recent release, here’s GitHub’s look at some of the most interesting features and changes introduced since last time.
Review merge conflict resolution with –remerge-diff
Returning readers may remember our coverage of merge ort, the from-scratch rewrite of Git’s recursive merge engine.
This release brings another new feature powered by ort, which is the --remerge-diff option. To explain what --remerge-diff is and why you might be excited about it, let’s take a step back and talk about git show.
When given a commit git show will print out that commit’s log message as well as its diff. But it has slightly different behavior when given a merge commit, especially one that had merge conflicts. If you’ve ever passed a conflicted merge to git show, you might be familiar with this output:
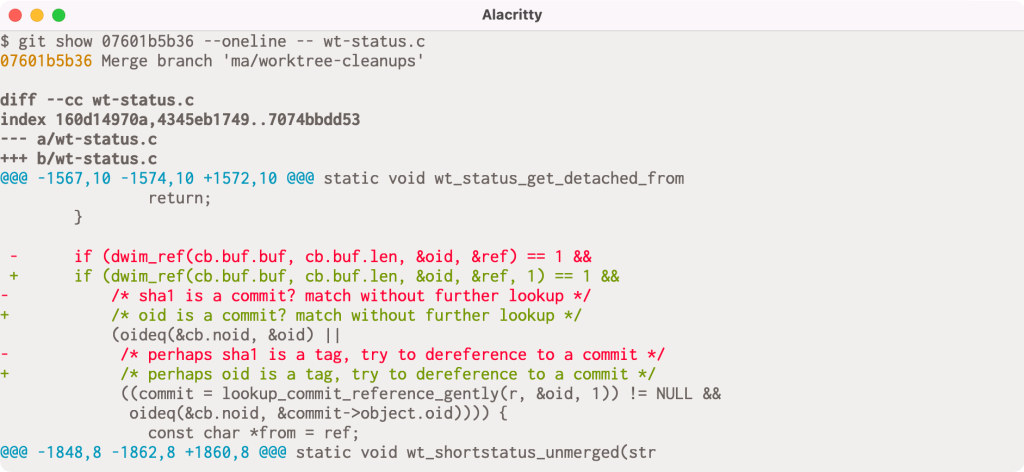
If you look closely, you might notice that there are actually two columns of diff markers (the + and - characters to indicate lines added and removed). These come from the output of git diff-tree -cc, which is showing us the diff between each parent and the post-image of the given commit simultaneously.
In this particular example, the conflict occurs because one side has an extra argument in the dwim_ref() call, and the other includes an updated comment to use reflect renaming a variable from sha1 to oid. The left-most markers show the latter resolution, and the right-most markers show the former.
But this output can be understandably difficult to interpret. In Git 2.36, --remerge-diff takes a different approach. Instead of showing you the diffs between the merge resolution and each parent simultaneously, --remerge-diff shows you the diff between the file with merge conflicts, and the resolution.
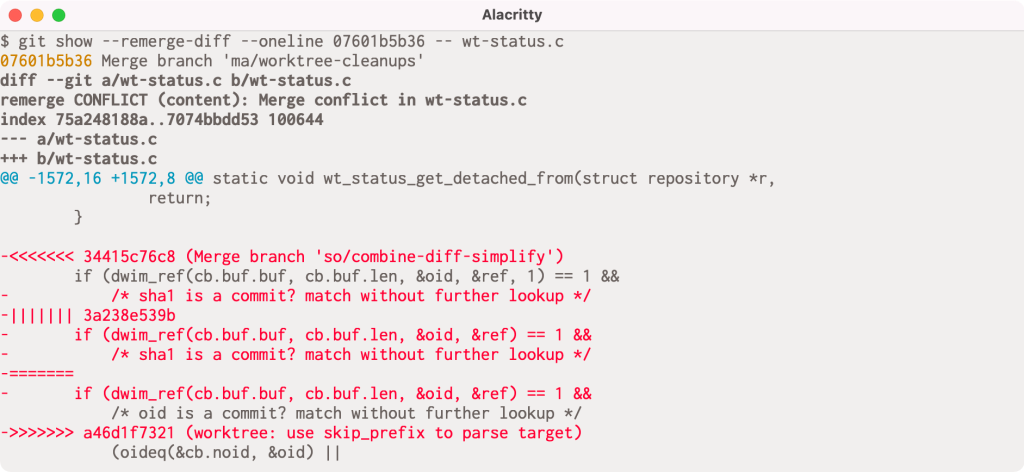
The above shows the output of git show with --remerge-diff on the same conflicted merge commit as before. Here, we can see the diff3-style conflicts (shown in red, since the merge commit removes the conflict markers during resolution) along with the resolution. By more clearly indicating which parts of the conflict were left as-is, we can more easily see how the given commit resolved its conflicts, instead of trying to weave-together the simultaneous diff output from git diff-tree -cc.
Reconstructing these merges is made possible using ort. The ort engine is significantly faster than its predecessor, recursive, and can reconstruct all conflicted merge in linux.git in about 3 seconds (as compared to diff-tree -cc, which takes more than 30 seconds to perform the same operation
[source]).
Give it a whirl in your Git repositories on 2.36 by running git show --remerge-diff on some merge conflicts in your history.
[source]
More flexible fsync configuration
If you have ever looked around in your repository’s .git directory, you’ll notice a variety of files: objects, references, reflogs, packfiles, configuration, and the like. Git writes these objects to keep track of the state of your repository, creating new object files when you make new commits, update references, repack your repository, and so on.
Most likely, you haven’t had to think too hard about how these files are written and updated. If you’re curious about these details, then read on! When any application writes changes to your filesystem, those changes aren’t immediately persisted, since writing to the external storage medium is significantly slower than updating your filesystem’s in-memory caches.
Instead, changes are staged in memory and periodically flushed to disk at which point the changes are (usually, though disks and controllers can have their own write caches, too) written to the physical storage medium.
Aside from following standard best-practices (like writing new files to a temporary location and then atomically moving them into place), Git has had a somewhat limited set of configuration available to tune how and when it calls fsync, mostly limited to core.fsyncObjectFiles, which, when set, causes Git to call fsync() when creating new loose object files. (Git has had non-configurable fsync() calls scattered throughout its codebase for things like writing packfiles, the commit-graph, multi-pack index, and so on).
Git 2.36 introduces a significantly more flexible set of configuration options to tune how and when Git will explicitly fsync lots of different kinds of files, not just if it fsyncs loose objects.
At the heart of this new change are two new configuration variables:
core.fsync and core.fsyncMethod. The former lets you pick a comma-separated list of which parts of Git’s internal data structures you want to be explicitly flushed after writing. The full list can be found in the documentation, but you can pick from things like pack (to fsync files in $GIT_DIR/objects/pack) or loose-object (to fsync loose objects), to reference (to fsync references in the $GIT_DIR/refs directory). There are also aggregate options like objects (which implies both loose-object and pack), along with others like derived-metadata, committed, and all.
You can also tune how Git ensures the durability of components included in your core.fsync configuration by setting the core.fsyncMethod to either fsync (which calls fsync(), or issues a special fcntl() on macOS), or writeout-only, which schedules the written data for flushing, though does not guarantee that metadata like directory entries are updated as part of the flush operation.
Most users won’t need to change these defaults. But for server operators who have many Git repositories living on hardware that may suddenly lose power, having these new knobs to tune will provide new opportunities to enhance the durability of written data.
Stricter repository ownership checks
If you haven’t seen our blog post from last week announcing the security patches for versions 2.35 and earlier, let me give you a brief recap.
Beginning in Git 2.35.2, Git changed its default behavior to prevent you from executing git commands in a repository owned by a different user than the current one. This is designed to prevent git invocations from unintentionally executing commands which the repository owner configured.
You can bypass this check by setting the new safe.directory configuration to include trusted repositories owned by other users. If you can’t upgrade immediately, our blog post outlines some steps you can take to mitigate your risk, though the safest thing you can do is upgrade to the latest version of Git.
Since publishing that blog post, the safe.directory option now interprets the value * to consider all Git repositories as safe, regardless of their owner. You can set this in your --global config to opt-out of the new behavior in situations where it makes sense.
[source]
Tidbits
Now that we have looked at some of the bigger features in detail, let’s turn to a handful of smaller topics from this release.
- If you’ve ever spent time poking around in the internals of one of your Git repositories, you may have come across the
git cat-filecommand. Reminiscent ofcat, this command is useful for printing out the raw contents of Git objects in your repository.cat-filehas a handful of other modes that go beyond just printing the contents of an object. Instead of printing out one object at a time, it can accept a stream of objects (via stdin) when passed the--batchor--batch-checkcommand-line arguments. These two similarly-named options have slightly different outputs:--batchinstructscat-fileto just print out each object’s contents, while--batch-checkis used to print out information about the object itself, like its type and size1.But what if you want to dynamically switch between the two? Before, the only way was to run two separate copies of the
cat-filecommand in the same repository, one in--batchmode and the other in--batch-checkmode. In Git 2.36, you no longer need to do this. You can instead run a singlegit cat-filecommand with the new--batch-commandmode. This mode lets you ask for the type of output you want for each object. Its input looks either likecontents <object>, orinfo <object>, which correspond to the output you’d get from--batch, or--batch-check, respectively.For server operators who may have long-running
cat-filecommands intended to service multiple requests,--batch-commandaccepts a newflushcommand, which flushes the output buffer upon receipt. -
Speaking of Git internals, if you’ve ever needed to script around the contents of a tree object in your repository, then there’s no doubt that
git ls-treehas come in handy.If you aren’t familiar with
ls-tree, the gist is that it allows you to list the contents of a tree objects, optionally recursing through nested sub-trees. Its output looks something like this:$ git ls-tree HEAD -- builtin/ 100644 blob 3ffb86a43384f21cad4fdcc0d8549e37dba12227 builtin/add.c 100644 blob 0f4111bafa0b0810ae29903509a0af74073013ff builtin/am.c 100644 blob 58ff977a2314e2878ee0c7d3bcd9874b71bfdeef builtin/annotate.c 100644 blob 3f099b960565ff2944209ba514ea7274dad852f5 builtin/apply.c 100644 blob 7176b041b6d85b5760c91f94fcdde551a38d147f builtin/archive.c [...]Previously, the customizability of
ls-tree‘s output was somewhat limited. You could restrict the output to just the filenames with--name-only, print absolute paths with--full-name, or abbreviate the object IDs with--abbrev, but that was about it.In Git 2.36, you have a lot more control about how
ls-tree‘s should look. There’s a new--object-onlyoption to complement--name-only. But if you really want to customize its output, the new--formatoption is your best bet. You can select from any combination and order of the each entry’s mode, type, name, and size.Here’s a fun example of where something like this might come in handy. Let’s say you’re interested in the distribution of file-sizes of blobs in your repository. Before, to get a list of object sizes, you would have had to do either:
$ git ls-tree ... | awk '{ print $3 }' | git cat-file --batch-check='%(objectsize)'or (ab)use the
--longformat and pull out the file sizes of blobs:$ git ls-tree -l | awk '{ print $4 }'but now you can ask for just the file sizes directly, making it much more convenient to script around them:
$ dist () {
 ruby -lne 'print 10 ** (Math.log10($_.to_i).ceil)' | sort -n | uniq -c
}
$ git ls-tree --format='%(objectsize)' HEAD:builtin/ | dist
  8 1000
 59 10000
 53 100000
  2 1000000
…showing us that we have 8 files that are between 1-10 KiB in size, 59 files between 10-100 KiB, 53 files between 100 KiB and 1 MiB, and 2 files larger than 1 MiB.
-
If you’ve ever tried to track down a bug using Git, then you’re familiar with the
git bisectcommand. If you haven’t, here’s a quick primer.git bisecttakes two revisions of your repository, one corresponding to a known “good” state, and another corresponding to some broken state. The idea is then to run a binary search between those two points in history to find the first commit which transitioned the good state to the broken state.If you aren’t a frequent bisect user, you may not have heard of the
git bisect runcommand. Instead of requiring you to classify whether each point along the search is good or bad, you can supply a script which Git will execute for you, using its exit status to classify each revision for you.This can be useful when trying to figure out which commit broke the build, which you can do by running:
$ git bisect start <bad> <good>
$ git bisect run make
which will run
makealong the binary search between<bad>and<good>, outputting the first commit which broke compilation.But what about automating more complicated tests? It can often be useful to write a one-off shell script which runs some test for you, and then hand that off to
git bisect. Here, you might do something like:$ vi test.sh # type type type $ git bisect run test.shSee the problem? We forgot to mark
test.shas executable! In previous versions of Git,git bisectwould incorrectly carry on the search, classifying each revision as broken. In Git 2.36,git bisectwill detect that you forgot to mark the script as executable, and halt the search early.[source]
-
When you run
git fetch, your Git client communicates with the remote to carry out a process called negotiation to determine which objects the server needs to send to complete your request. Roughly speaking, your client and the server mutually advertise what they have at the tips of each reference, then your client lists which objects it wants, and the server sends back all objects between the requested objects and the ones you already have.This works well because Git always expects to maintain closure over reachable objects2, meaning that if you have some reachable object in your repository, you also have all of its ancestors.
In other words, it’s fine for the Git server to omit objects you already have, since the combination of the objects it sends along with the ones you already have should be sufficient to assemble the branches and tags your client asked for.
But if your repository is corrupt, then you may need the server to send you objects which are reachable from ones you already have, in which case it isn’t good enough for the server to just send you the objects between what you have and want. In the past, getting into a situation like this may have led you to re-clone your entire repository.
Git 2.36 ships with a new option to
git fetchwhich makes it easier to recover from certain kinds of repository corruption. By passing the new--refetchoption, you can instructgit fetchto fetch all objects from the remote, regardless of which objects you already have, which is useful when the contents of yourobjectsdirectory are suspect.[source]
-
Returning readers may remember our earlier discussions about the sparse index and sparse checkouts, which make it possible to only have part of your repository checked out at a time.
Over the last handful of releases, more and more commands have become compatible with the sparse index. This release is no exception, with four more Git commands joining the pack. Git 2.36 brings sparse index support to
git clean,git checkout-index,git update-index, andgit read-tree.If you haven’t used these commands, there’s no need to worry: adding support to these plumbing commands is designed to lay the ground work for building a sparse index-aware
git stash. In the meantime, sparse index support already exists in the commands that you are most likely already familiar with, likegit status,git commit,git checkout, and more.As an added bonus,
git sparse-checkout(which is used to enable the sparse checkout feature and dictate which parts of your repository you want checked out) gained support for the command-line completion Git ships in itscontribdirectory. -
Returning readers may remember our previous coverage on partial clones, a relatively new feature in Git which allows you to initialize your clones by downloading just some of the objects in your repository.
If you used this feature in the past with
git clone‘s--recurse-submodulesflag, the partial clone filter was only applied to the top-level repository, cloning all of the objects in the submodules.This has been fixed in the latest release, where the
--filterspecification you use in your top-level clone is applied recursively to any submodules your repository might contain, too. -
While we’re talking about partial clones, now is a good time to mention partial bundles, which are new in Git 2.36. You may not have heard of Git bundles, which is a different way of transferring around parts of your repository.
Roughly speaking, a bundle combines the data in a packfile, along with a list of references that are contained in the bundle. This allows you to capture information about the state of your repository into a single file that you can share. For example, the Git project uses bundles to share embargoed security releases with various Linux distribution maintainers. This allows us to send all of the objects which comprise a new release, along with the tags that point at them in a single file over email.
In previous releases of Git, it was impossible to prepare a filtered bundle which you could apply to a partial clone. In Git 2.36, you can now prepare filtered bundles, whose contents are unpacked as if they arrived during a partial clone3. You can’t yet initialize a new clone from a partial bundle, but you can use it to fetch objects into a bare repository:
$ git bundle create --filter=blob:none ../partial.bundle v2.36.0 $ cd .. $ git init --bare example.repo $ git fetch --filter=blob:none ../partial.bundle 'refs/tags/*:refs/tags/*' [ ... ] From ../example.bundle * [new tag] v2.36.0 -> v2.36.0 -
Lastly, let’s discuss a bug fix concerning Git’s multi-pack reachability bitmaps. If you have started to use this new feature, you may have noticed a handful of new files in your
.git/objects/packdirectory:$ ls .git/objects/pack/multi-pack-index* .git/objects/pack/multi-pack-index .git/objects/pack/multi-pack-index-33cd13fb5d4166389dbbd51cabdb04b9df882582.bitmap .git/objects/pack/multi-pack-index-33cd13fb5d4166389dbbd51cabdb04b9df882582.revIn order, these are: the multi-pack index (MIDX) itself, the reachability bitmap data, and the reverse-index which tells Git which bits correspond to what objects in your repository.
These are all associated back to the MIDX via the MIDX’s checksum, which is how Git knows that the three belong together. This release fixes a bug where the
.revfile could fall out-of-sync with the MIDX and its bitmap, leading Git to report incorrect results when using a multi-pack bitmap. This happens when changing the object order of the MIDX without changing the set of objects tracked by the MIDX.If your
.revfile has a modification time that is significantly older than the MIDX and.bitmap, you may have been bitten by this bug4. Luckily this bug can be resolved by dropping and regenerating your bitmaps5. To prevent a MIDX bitmap and its.revfile from falling out of sync again, the contents of the.revare now included in the MIDX itself, forcing the MIDX’s checksum to change whenever the object order changes.[source]
The rest of the iceberg
That’s just a sample of changes from the latest release. For more, check out the release notes for 2.36, or any previous version in the Git repository.
-
You can ask for other attributes, too, like
%(objectsize:disk)which shows how many bytes it takes Git to store the object on disk (which can be smaller than%(objectsize)if, for example, the object is stored as a delta against some other, similar object). ↩ - This isn’t quite true, because of things like shallow and partial clones, along with grafts, but the assumption is good enough for our purposes here. What matters it that outside of scenarios where we expect to be missing objects, the only time we don’t have a reachability closure is when the repository itself is corrupt. ↩
- In Git parlance, this would be a packfile from a promisor remote. ↩
-
This isn’t entirely fool-proof, since it’s possible way of detecting that this bug occurred, since it’s possible your bitmaps were rewritten after first falling out-of-sync. When this happens, it’s possible that the corrupt bitmaps are propagated forward when generating new bitmaps. You can use
git rev-list --test-bitmap HEADto check if your bitmaps are OK. ↩ -
By first running
rm -f .git/objects/pack/multi-pack-index*, and then
git repack -d --write-midx --write-bitmap-index. ↩
Tags:
Written by

Related posts

$100 million for open source: A milestone built by the community
Celebrating $100 million contributed by the community to the people who build and sustain open source every day.
6 security settings every GitHub maintainer should enable this week
These six free settings will not make your project unhackable. Nothing will. What they will do is close the easy doors. Turn these on, and your project will be meaningfully harder to attack than it was before.
How GitHub maintains compliance for open source dependencies
Explore how the Open Source Program Office uses GitHub’s new license compliance product to manage open source dependencies at scale.