Announcing GitHub for Mac
Pull requests, merge button, fork queue, issues, pages, wiki –– all awesome features that make sharing easier. But those things are only great after you’ve pushed your code to GitHub.…
Pull requests, merge button, fork queue, issues, pages, wiki –– all awesome features that make sharing easier. But those things are only great after you’ve pushed your code to GitHub.
Today we’re happy to announce GitHub for Mac.
What does it look like?
When you first launch GitHub for Mac, we’ll help you set up your GitHub account and find repositories already on your computer. From there, you can start managing repositories.

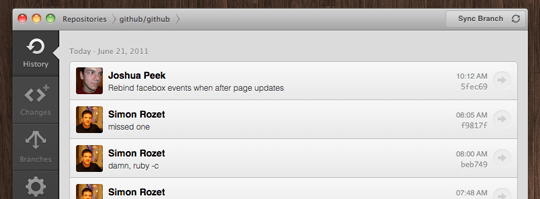
Once you dive into a repository, you’ll be able to view the commit history just as you would on the web.
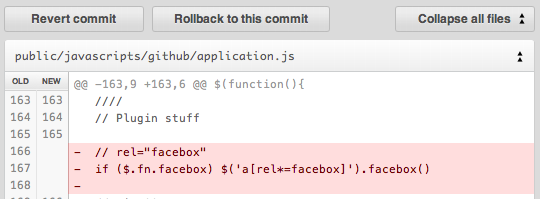
And you can of course dive in to a specific commit to see the diff and perform some operations.
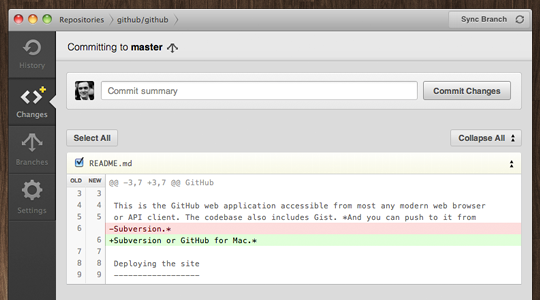
Once you’ve made some changes, you’ll be able to create commits.
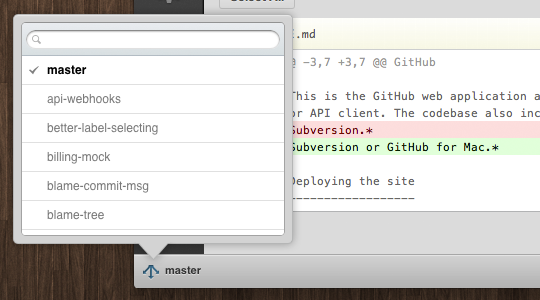
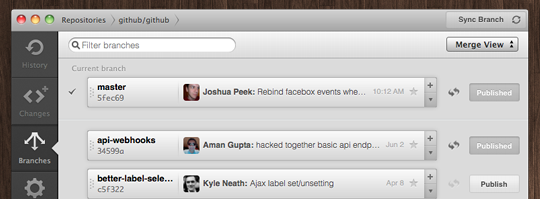
When you want to change branches quickly, press ⌘ + B and a branch selector will show up.
Changing branches automatically stashes any changes until you switch back to the branch — switch branches with wild abandon. If you need to publish branches to GitHub, create a new branch, merge branches, or delete branches switch on over to the branches tab.
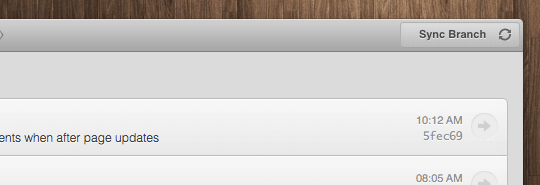
Once you’re ready to share your commits, or pull in remote commits — just press the Sync Branch button. We’ll perform a smarter version of pull --rebase && push that reduces merge commits but doesn’t rewrite your merges.
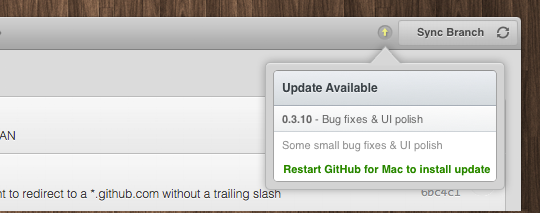
Automatic updates
Once you download GitHub for Mac, we’ll send out updates and the app will automatically download them. Keep an eye out for a little upgrade notice with a list of changes.
Behind the curtains
GitHub for Mac wouldn’t have been possible without some awesome open source projects:
- libgit2 powers much of the Git operations for the app, making every interaction smooth, responsive and fast.
- objective-git libgit2 bindings bridge the gap between Cocoa & libgit2.
- Chameleon powers a good portion of the GUI. We’re working with the Chameleon guys to get our changes into the main project, but in the mean time you can check out Josh’s fork with all our modifications.
Just the start
This is just the beginning — we’re really stoked for the future of GitHub for Mac and hope you will be too.
GitHub for Mac 1.0 is free and available today
Written by

Related posts

GitHub availability report: June 2026
In June, we experienced six incidents that resulted in degraded performance across GitHub services.
Q1 2026 Innovation Graph update: Open source collaboration is accelerating worldwide
New Innovation Graph data shows global developer communities growing faster than ever, with collaboration reaching new highs across many economies.
GitHub joins coalition advocating for fixes to California AI Transparency Act to protect open source
We’re calling for targeted amendments to resolve conflicts with open source licensing and align with international transparency frameworks while preserving regulatory intent.